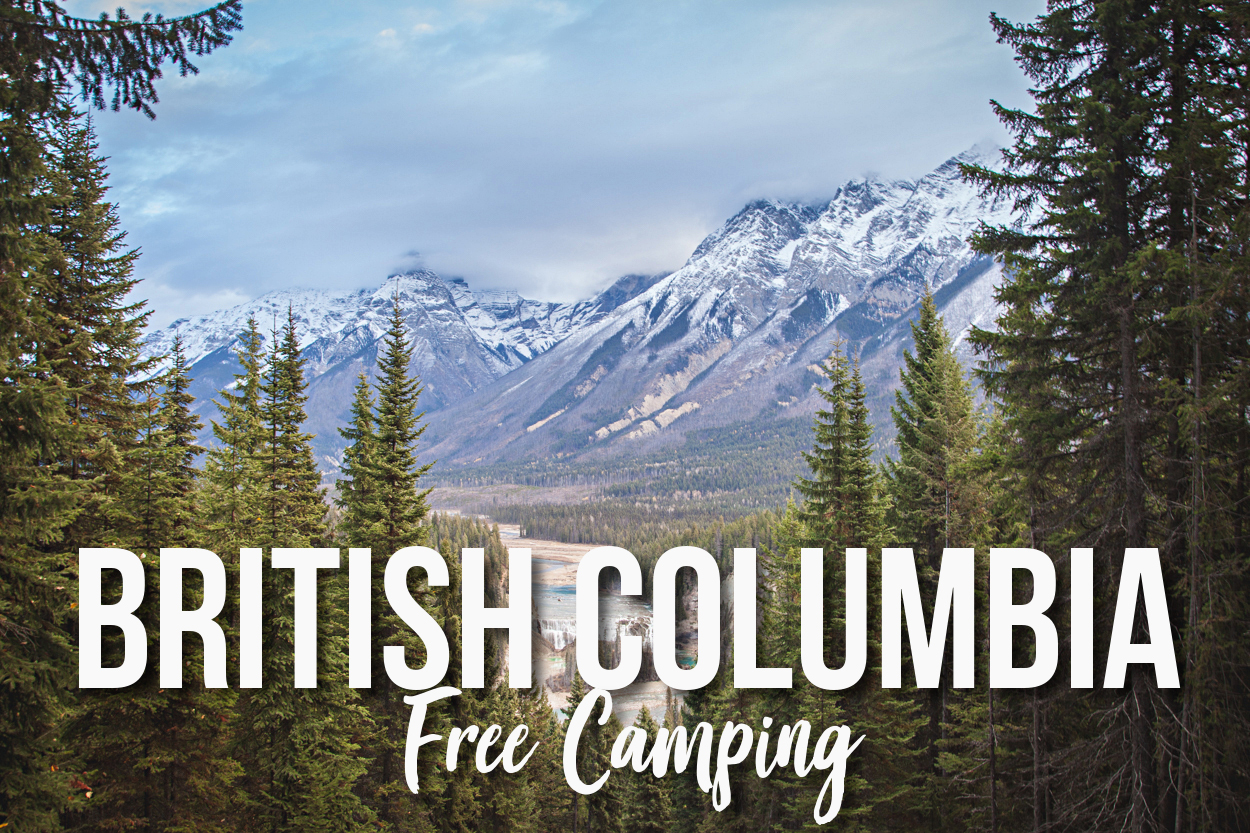
FREE Camping: Wapta Falls Recreation Site-Field, British Columbia

If you haven’t noticed yet, we don’t like paying for camping. We especially don’t like paying for camping when we are traveling through beautiful Western Canada and every dollar means we can stay on the road a little longer and see more of this beautiful country. Many thanks to the British Columbia Recreation Department for having so many awesome, free campsites and trails for public use. This one was located just down the road from Wapta Falls and offered amazing views of the falls and the mountains beyond.

How to Get There- (GPS: 51.109397, -116.500873)

Once you visit Jasper National Park, travel back down the Icefields Parkway and turn West on HWY 1 toward Field turn onto Beaverfoot Rd. Stay on Beaverfoot Rd for nearly 8 miles of rough logging road and turn left at the sign for Wapta Falls Recreation Site. The dirt road to the campsites is rutted and could be difficult to navigate in wet weather. We managed fine through a few puddles in a 19 ft. Class C RV. Getting out was a little tricky, but with some careful driving we made it out with no problem.

We pulled in at night and didn’t really understand how good of a FREE camping spot we had stumbled upon. Rachael started working on a delicious meal of red beans and rice and I took a walk outside to see what I could see, and hear. The sound of Wapta Falls 2000 feet below was LOUD! And if the stars could make noise they would have drown out the falls. This was by far the best night for night photography on our trip, but it didn’t last long. By the time Rachael got done with dinner, most of the stars had hidden themselves behind cloud cover.

We rested easy knowing that the parking brake was on and that we would awake to the sound of a mountain waterfall and what was sure to be a beautiful view. We slept in the next morning and awoke to great conditions and undoubtedly one of the best views of the trip. Chancellor Peak and Mt. Vaux dominate the horizon and Wapta Falls, massive in its own right, is dwarfed by the peaks above. It is crazy to think that only a day before we were hiking to the abandoned campground and the hoodoos at the base of Chancellor Peak and now we were viewing the same peak from a great distance.

You could say that there were facilities here. There were a couple of fire pit areas and a couple of picnic tables that seemed to be pretty well maintained. There was also a pit toilet between the campsites that seemed to be in okay shape. We would definitely poop here again.

Activities in the Area

  • Wapta Falls Hike-The most obvious activity in the immediate area is to hike to Wapta Falls. The falls are beautiful and huge. There are two options to hike to the falls from this campsite. One is to drive Beaverfoot Rd back to HWY 1 and turn West until you see the sign for Wapta Falls on your right. The second option (we suggest this one) is to hike down and bushwhack your way from the campsite to the falls. It is a lot of elevation to climb back up, but we think the views will more than make up for it.
  • Golden, BC- This quiet little town was one of our favorites from the trip mostly because of the quaint size and the amenities that abounded for such a small town. Our favorite stop in Golden was Bacchus Books. This bookstore doubles as a cafe and coffee shop. The selection of books was impressive considering the whole place couldn’t have been 2000 square feet on both floors. We enjoyed the baked goods and reading in a coffee shop that wasn’t packed full of people.

It really was a shame that we had to leave this campsite so soon, but we had more to see in Yoho and time was starting to run out on our Canadian adventure. We hope that you enjoyed our review of this campsite and hope that you continue to follow our adventures on YouTube, Instagram and Facebook as @okienomads.

A Hike Through an Abandoned Campground: Hoodoo Creek Trail, Yoho National Park

Abandoned campsites. Dilapidated bathroom facilities. Wood stoves and propane tanks. 75 tent campsites left to ruin. What causes a large campground in a Canadian National Park close abruptly and leave large amounts of infrastructure to be taken back by the forest?

In 2013, Parks Canada elected to close Chancellor Peak Campground, which provided 59 campsites on the Western side of Yoho National Park. The decision was made after extreme flooding of the Kicking Horse River ripped through the Chancellor Peak Campground in Summer 2012. Parks officials stated that money was set aside to remove infrastructure such as fire rings, picnic tables, and buildings before more damage could occur.

Then why was Hoodoo Creek Campground abandoned in 2001 and left to rot? Seventy-five campsites lay empty near the town of Field, BC with remains of numbered signs still showing the rings of tent-sites barely visible through the grass and trees that have overgrown around them. Large bathroom facilities sit unlocked and still fully furnished with large amounts of plumbing supplies laying in their stalls. Huge, covered outdoor gathering areas with wood stoves and picnic tables lay un-touched if you disregard the numerous graffiti tags scattered through-out. Large dumpsters and outbuildings remain unused and still in relatively good shape considering the time that they have sat in the bitter Alberta winters.

Online research into the Hoodoo Creek Campground and it’s closure returned very little information. While digging through a Land Management Plan for Yoho NP from 2000, I found a section that mentions efforts to “Examine ways to improve wildlife movement at constricted areas, called pinch points… the Hoodoo Campground”. The Canadian Government has shown time and again that it is serious about protecting wildlife, but would it close a profitable campground in a unique location simply to allow animals to pass through the area easier? If so, wouldn’t Parks Canada Marketing take a story like that and run with it?

The location is still used heavily by visitors that seek to use the 30 campsites at the entrance to the campground, far from the A-F loops of the old campground. Thousands of visitors have probably stayed in the new sites without even knowing that the old sites were still there, that is how heavy the underbrush and trees have become. The other major draw to this area is a 3.3 KM hike to a rock formation called a Hoodoo, the namesake of the abandoned campground.

Mt. Chancellor towering over the abandoned Hoodoo Creek Campground

Once parked at the road block that keeps visitors from visiting the old campsites you must travel down a flat gravel road to reach the campground and Hoodoo Creek. You will begin to see campground signs for Camp A, B, C… Within each ring of sites, you will see short 4×4 posts with numbers on them marking where a tent pad used to be. Travel past the campsites to the creek and cross over to get to the trailhead. It appears that a few iterations of a bridge have been built over time and all have been wiped away by the spring snow melt.

Keep in mind that this is a very, very, steep trail. It gains over 300 m of elevation over less than a couple of kilometers. You begin hiking a set of gradual switchbacks through Douglas fir and the remnants of a prescribed burn in 2005. When we visited in October of 2017, the trail was clear and in good shape.

The switchbacks continue until you round the corner with a clear view of Mt. Chancellor and Wapta Falls in the distance. More on that in a later post. Continue around the bend and you will begin to see views of several Hoodoos jutting out of the side of the hill and Hoodoo Creek directly below. You will reach a sign for a couple of different view points. I advise taking the upper view point as the lower simply wasn’t very impressive.

Hoodoos are formed when softer rock is eroded away, yet the sedimentary rock that is covered by the harder stone above is protected from erosion and remains, forming a tower-like formation. The Lenchcoil Hoodoos are rare in that this type of rock formation is normally found in drier climates than Yoho NP.

The view from the edge of the Hoodoos is fantastic and it gives a very real sense of the size and scale of the formations. Continue up the trail for an interesting perspective of interesting objects, or spend some time soaking up the views of the crazy rocks from below.

This hike is an out and back and as you descend back to the creek you will be rewarded with excellent views of the surrounding valley. Wapta Falls is visible in a Tolkien-esque landscape over the horizon and should definitely be on your list of sites to see if you are fortunate enough to visit Yoho National Park. The hike down is much more enjoyable that the rather tough hike up to the Hoodoos.

A final note on the Hoodoos Campground: Although we thoroughly enjoyed our time exploring the Hoodoo Creek area, we couldn’t seem to get past the idea that something tragic happened here. When we crossed back across the creek, we found a water pump house next to a large water storage tank, a couple of thousand gallons of capacity if I had to guess. Inside this ridiculously well-maintained pump house was a brand new generator that had enough juice to power a small village. All of the water fittings on the storage tank were in excellent shape and had been used recently. We also found a large mass of water pipe that appeared to be used to pump water out of the creek at some point.

Is this a secret water heist?

Was there a mass-murder in the Hoodoo Creek Campground in 2001? 

Or was this simply a move by Parks Canada to protect the travel of wildlife from one area of the park to another?

My research was inconclusive and hopefully someone who reads this can fill us in on what exactly happened at Hoodoo Creek. If you have information about this mysterious campground, we would love to hear from you. As always, follow us on Instagram to get the most up to date images and video from our trips and build progress on our bus. We would love it if you would check out the rest of the blog and the YouTube page as well. All social media is @okienomads. Thanks for reading and have a blessed day!

SaveSave

SaveSave

SaveSave

Jasper, AB: The Town of No Elk

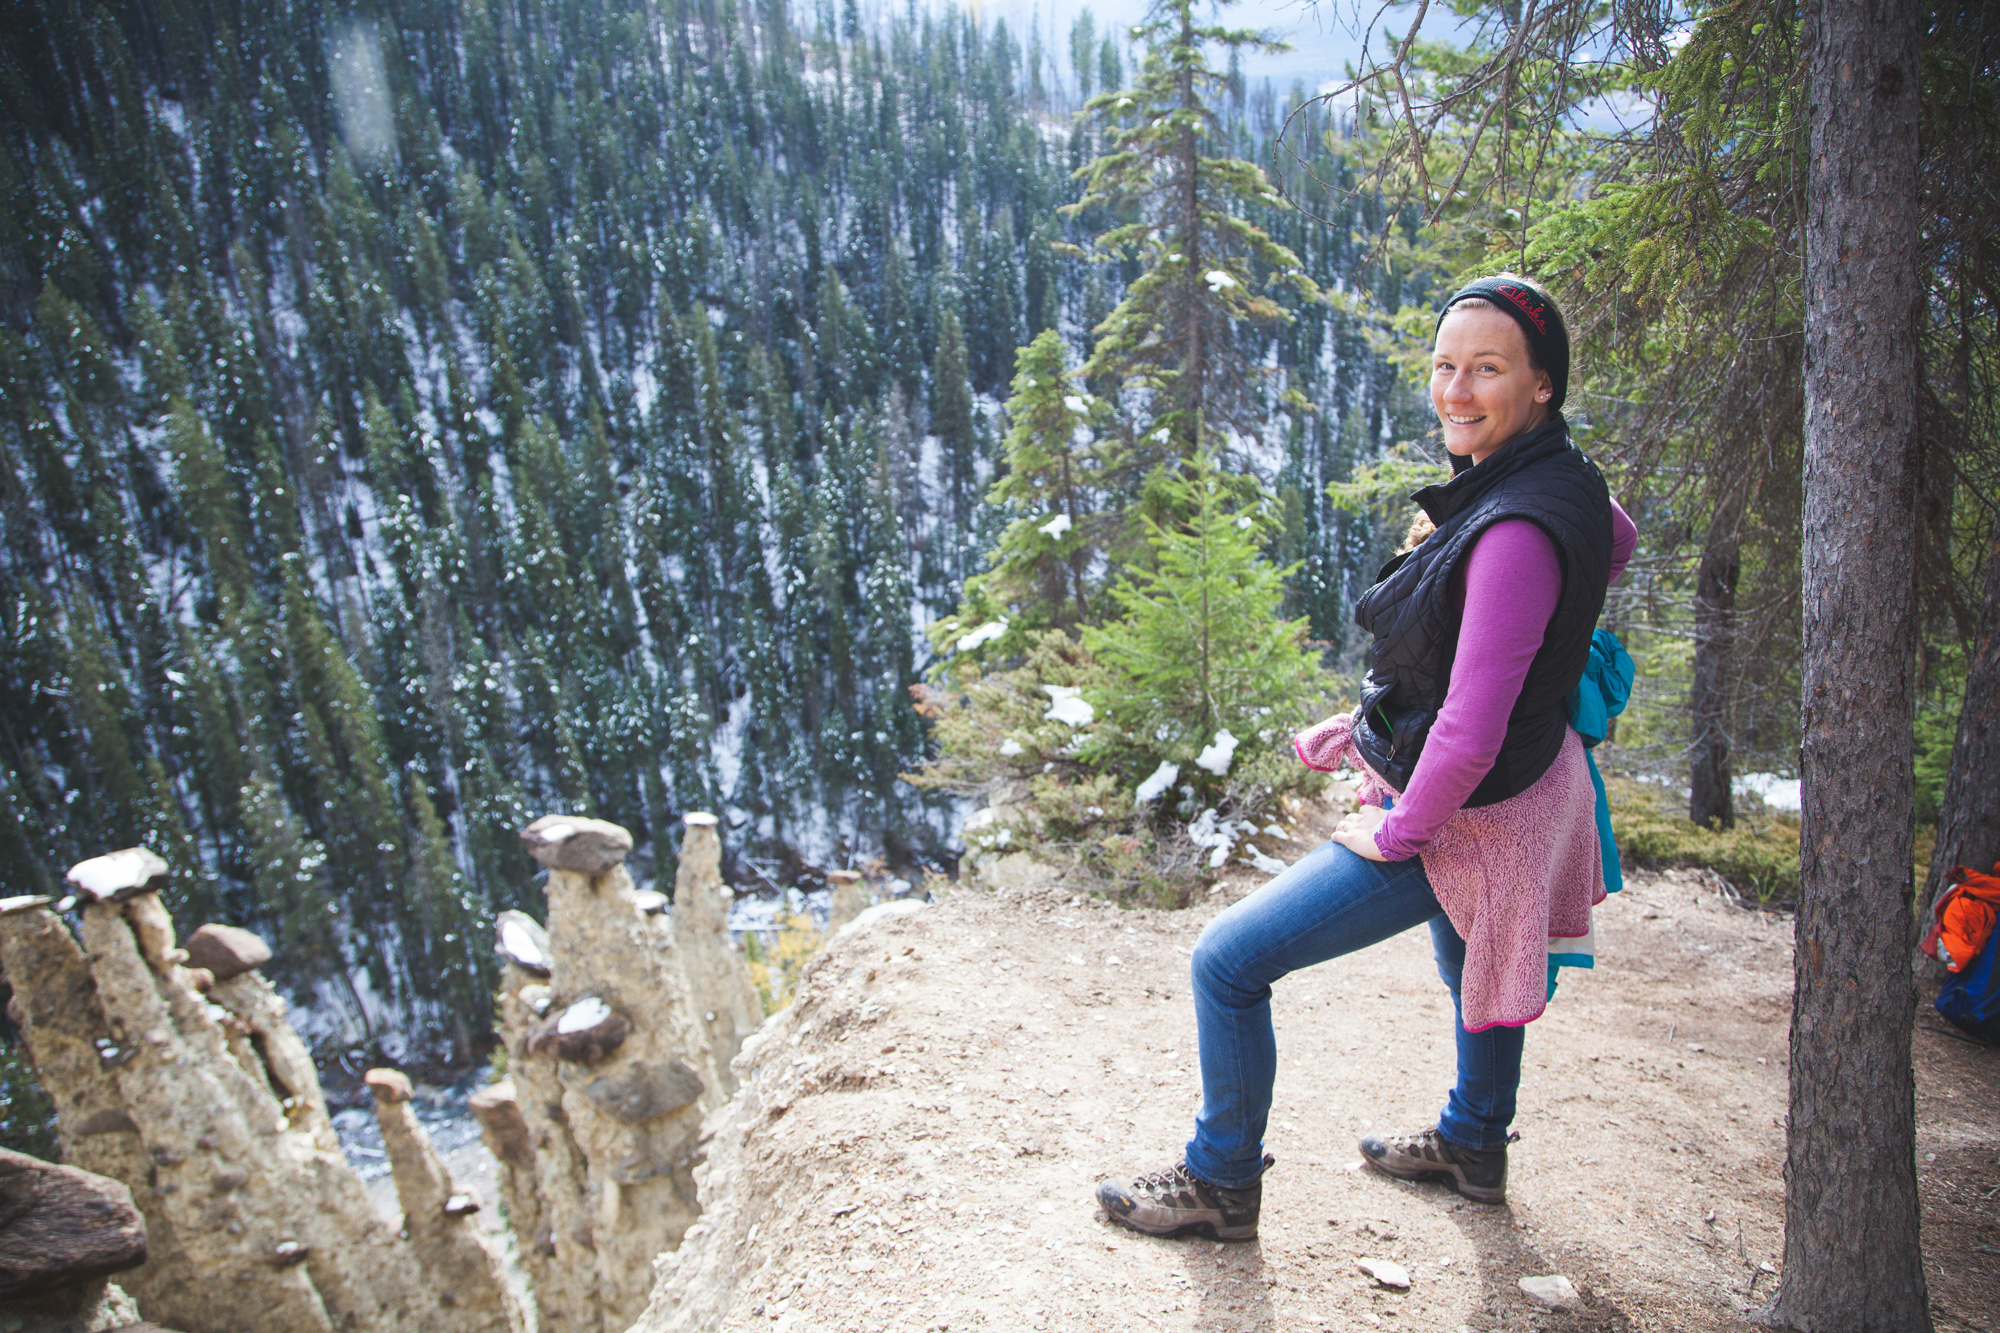
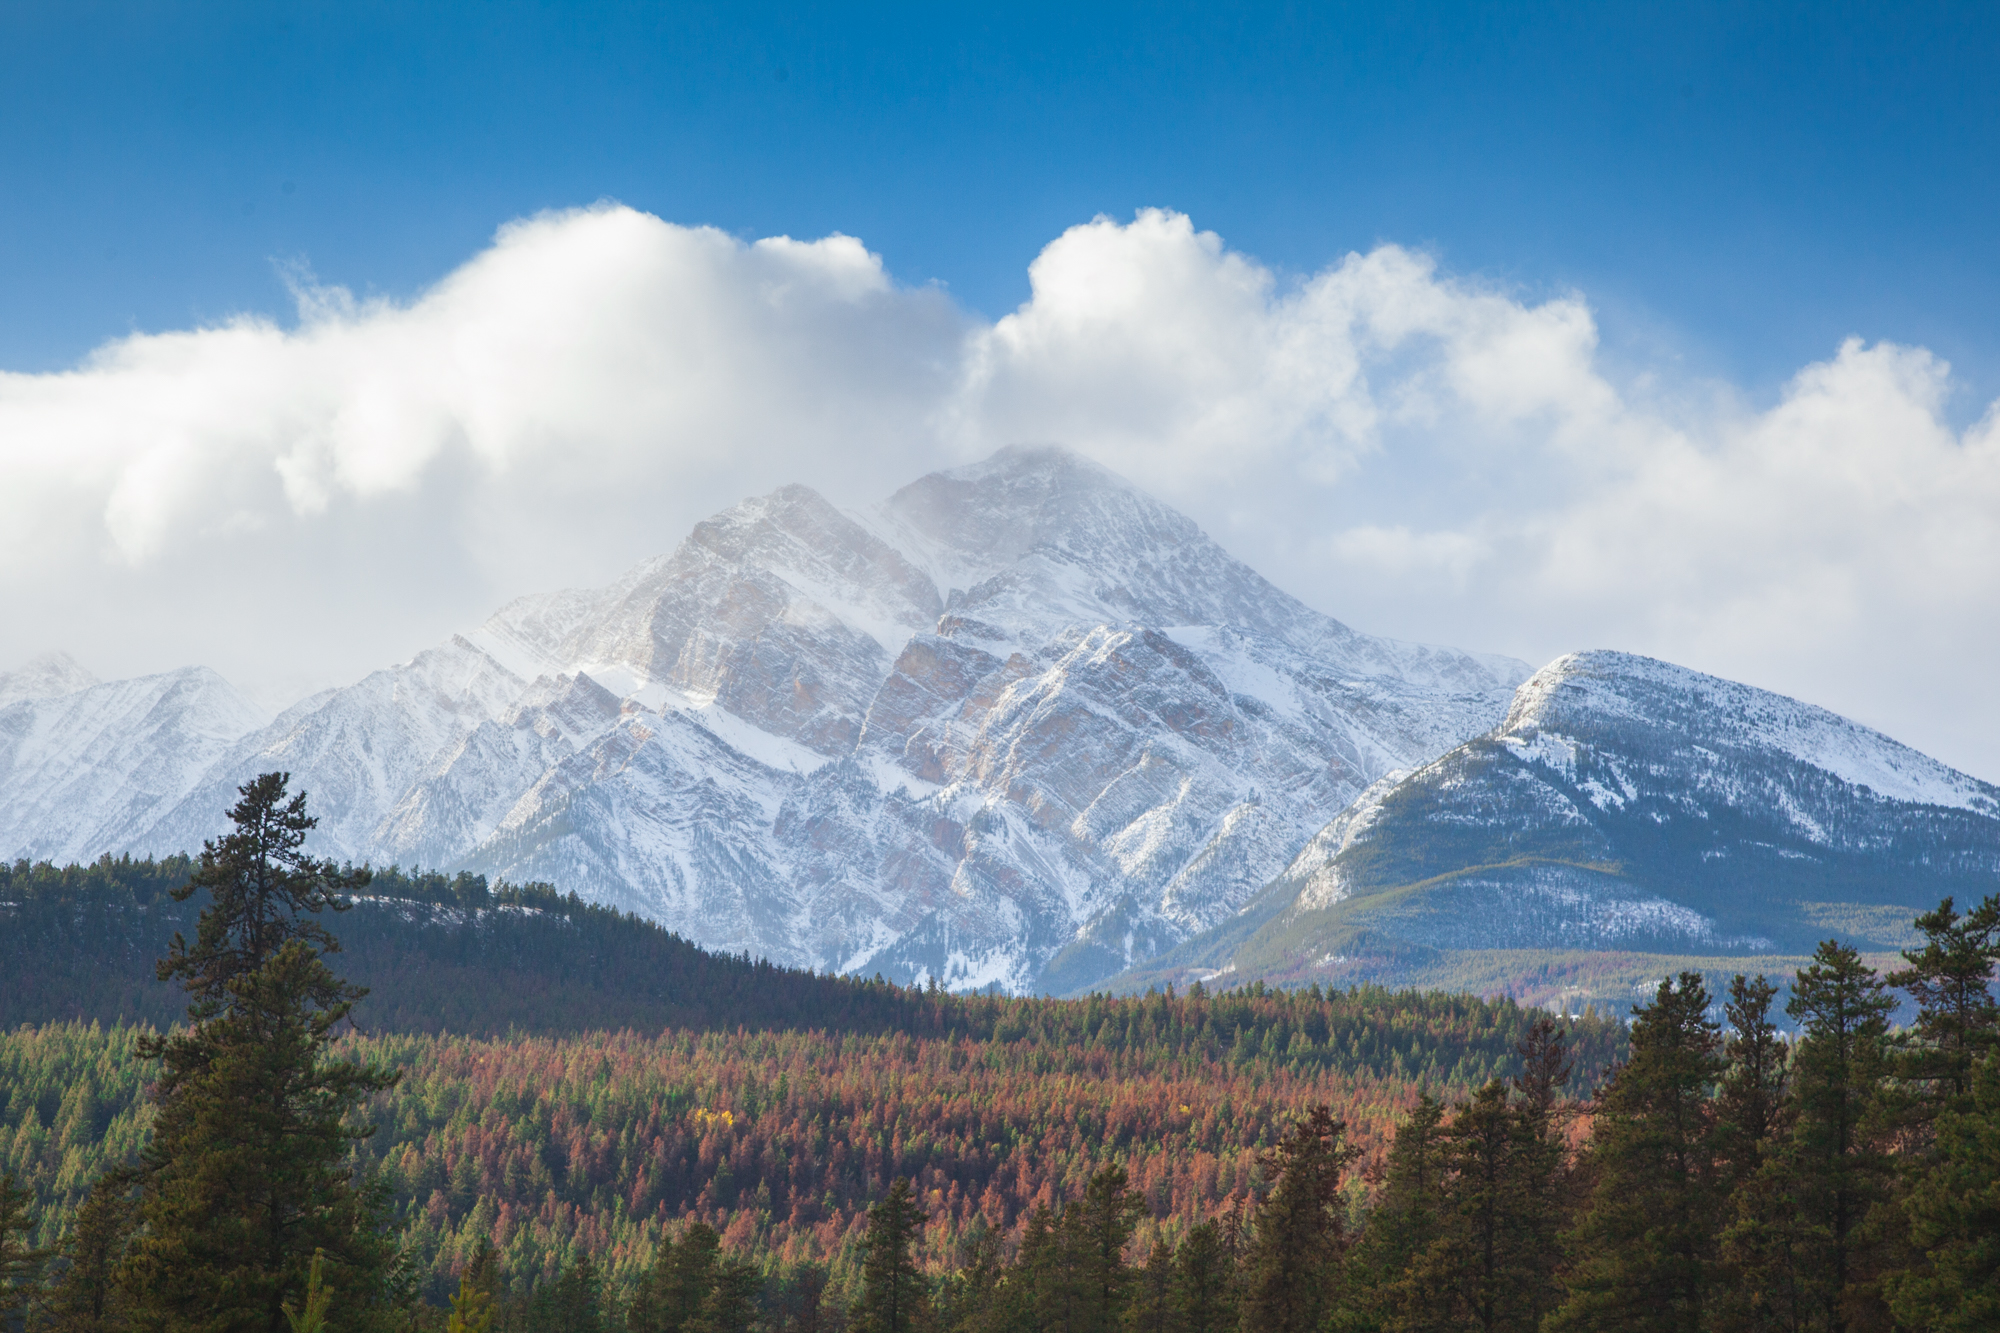
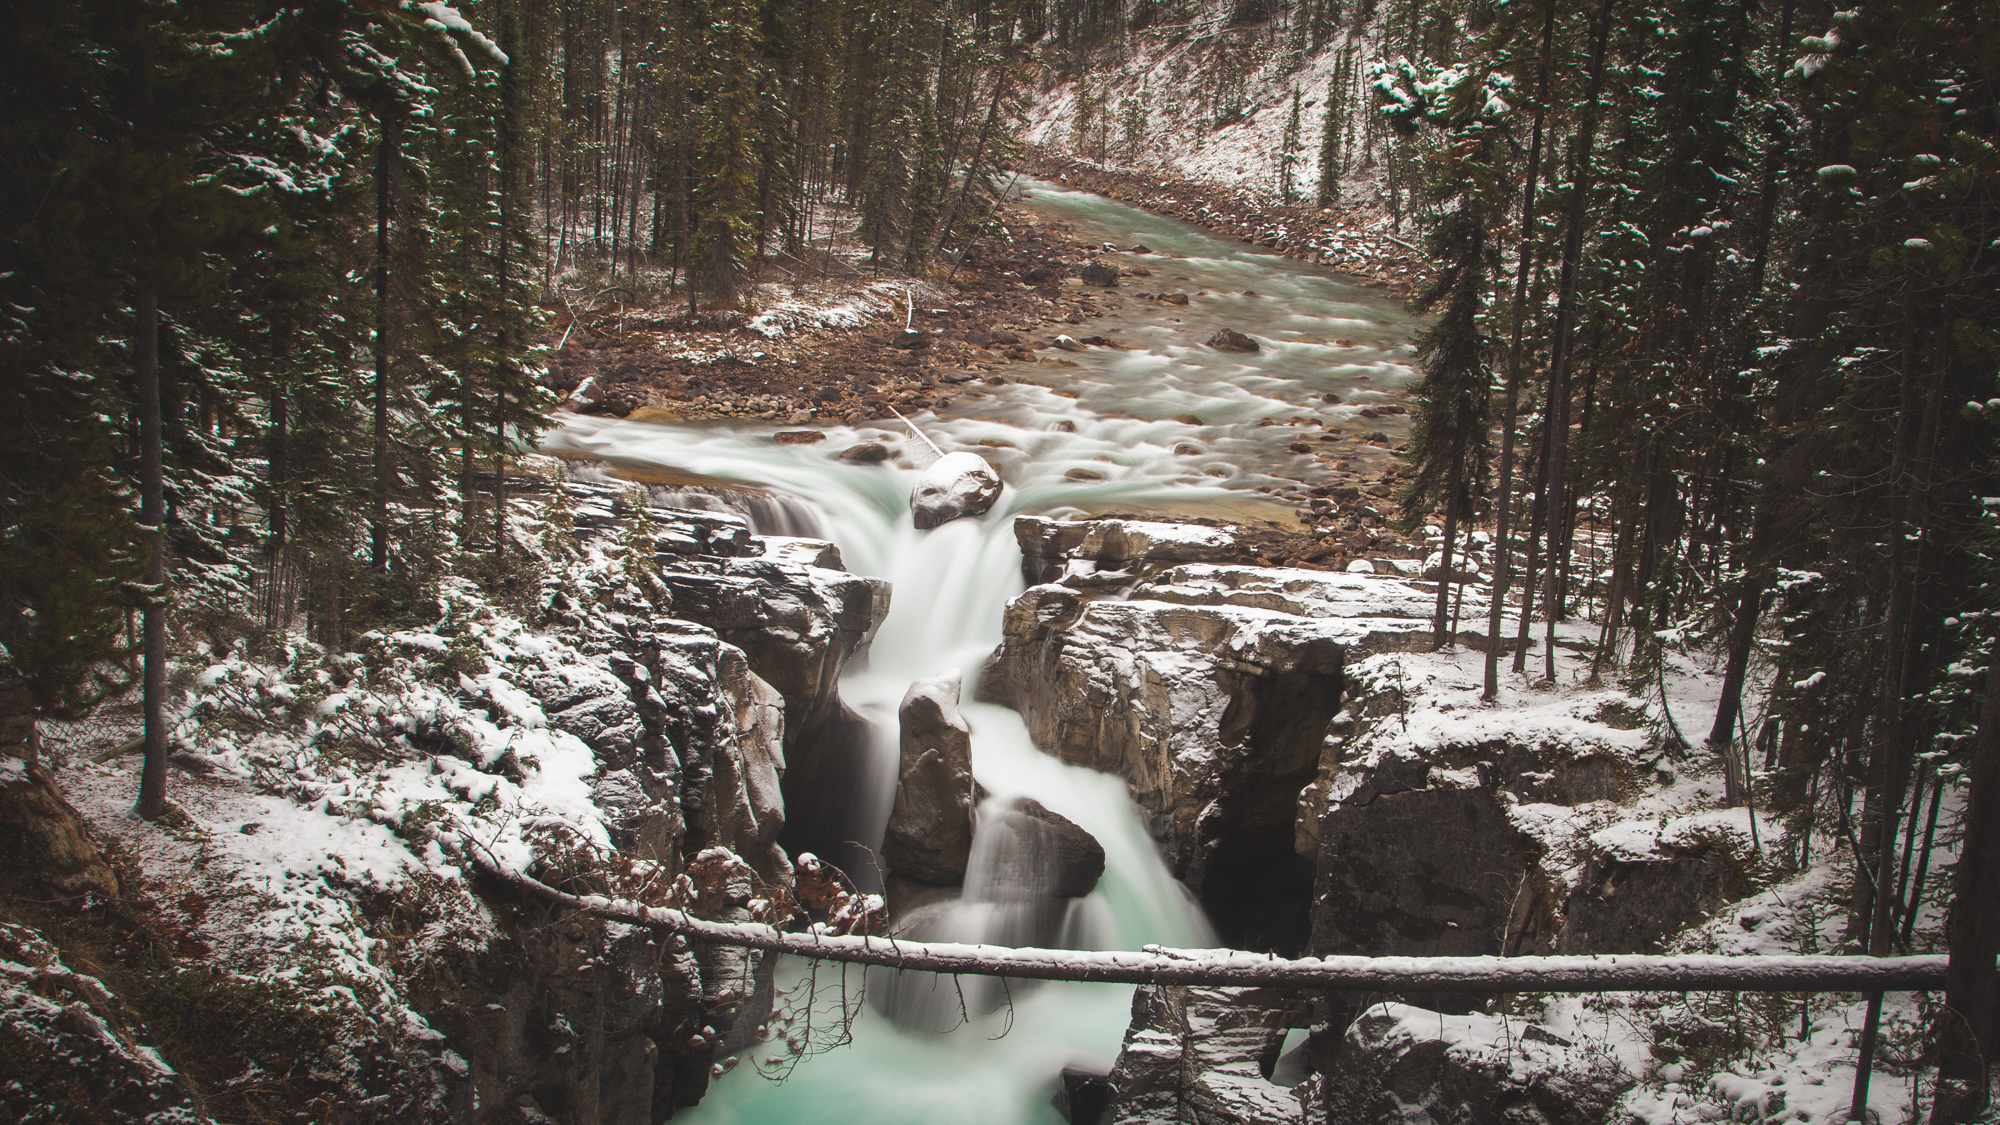
When we arrived to our campground just outside of town, I went for a little run into Jasper along the town’s trail system. The air was cold, but not uncomfortable and the run was fantastic. I ran 3 miles into town and back to our campground.I only had to touch pavement twice, in crosswalks. It is truly fascinating that a town that essentially closes for half of the year has a comprehensive trail system that encircles the entire town. I need to figure out an efficient method of taking pictures and video while running. Maybe I will start taking my phone with me, we will see. Once I got back to the campground, we had dinner and went to check out the river at night, together.

Athabasca River-Jasper, AB

The riverside was beautiful. We walked along the water and took in the sights, hoping for a glimpse at the Northern Lights. I think we were still a little early in the season and early in the evening. The clear skies were still a sight to see. We relaxed into a really nice evening in the RV with some reading and a nice night’s sleep. Needless to say, we weren’t alone.

Wapita Campground- Jasper, AB

We awoke to the sound of a diesel hunting truck warming up for a while and the rest of the morning was peaceful. We had a quick breakfast, enjoyed the heated bathroom and drove into Jasper.

I have to mention something that I have written about in previous posts. Just because you pay $25USD for a campsite in a National Park, doesn’t mean that you won’t be parking in a parking lot with 100 other RV’s. That is the main reason why we try to camp off of the beaten path when we travel in our skoolie. There is more privacy, less noise, and normally a much better view. Be on the lookout for our next blog post in this series from a beautiful campsite just over the border into British Columbia.

We made the short drive into Jasper and needed two utilities really badly, coffee and laundry.

Skoolie Tip #003: Pack light. In the case of our bus, it is a 4-window, basically the smallest modern skoolie you can own. If we packed all of the clothing that we owned in it, we would not have room for gear or food. By having about a week’s worth of clothing and planning outfits that use multiple combinations of a few key clothing articles, we save space and the amount of weight that we have to carry into the laundromat.

We found both coffee and laundry in the Snowdome Laundromat in downtown Jasper. The concept of this business is genius. It is a laundromat that also serves coffee. Or it’s a coffee shop, with laundry machines. Either way, it helped us shave one stop off of our day of errands in Jasper. We spent a couple of hours there on a weekday morning and it was busy There were roughly 20 people drinking coffee and around 10 doing laundry. It seemed to be a happening place. I would give this place 5 stars, but they had timed internet, which as a traveller, is crippling and really challenging. When you have been on the road for a week, 30 minutes of internet isn’t a lot. Regardless, next time I am in Jasper I will go get a cup of coffee here even if I don’t need to wash the pants that I have worn for 4 days straight.

Snowdome Laundromat at 607 Patricia St.

Once done with laundry and a resupply in Jasper, we took off for Maligne Canyon and Maligne Lake. The canyon is extremely accessible and has paved ADA walkways to most of the features of the canyon. The canyon runs so deep that you almost can’t see the water from the edge. We had only a limited amount of time at the canyon, but I am convinced that you could spend all day walking the trails to the different cascades.

Maligne Canyon-Jasper, AB

Maligne Canyon was a nice break to stretch our legs and prepare for the winding and snowy road to Maligne Lake. The road passes by Medicine Lake, which is a site to see in it’s own right. Once you get to Maligne Lake the first thing you notice is the iconic Maligne Lake Boathouse that dates back to 1928. Donald “Curly” Phillips built the boat house to attract business to his hunting and fishing trips to the lake. He stocked the lake with trout that he transported in barrels to the shores. Phillips lived in the boat house until his untimely death in an avalanche accident in 1936. The house is now used as storage for rental canoes and paddleboat used by Maligne Lake Tours. As most popular images of this location reveal, the boat house roof is in fact bright red, we visited when it was covered by snow.

Maligne Lake Boathouse- Jasper, AB
Maligne Lake- Jasper, AB

Winding back along the road from Maligne Lake we witnessed a couple of moose spending some quality time together and the crowd quickly gathered on the side of the highway to view the massive and majestic creatures. We left the moose alone and continued back to Jasper. We were rewarded for giving the moose their space with one of the most extravagant views that I have ever seen. It gives me chills writing about it months later. Pyramid Mountain, aptly named in the 1800’s for it’s appearance, dominates the horizon above Jasper and quickly became one of my favorite shots of all-time.

Pyramid Mountain- Jasper, AB

Jasper was an interesting place that we caught at an interesting time. During the summer, I imagine the hiking, biking, and climbing is spectacular. Likewise in the winter I can’t imagine the possibilities of winter activities. Shoulder season seemed like a great time to visit Jasper without the crowds, but also without the elk. We spent 2 days in Jasper and didn’t see a single elk. This was a little disappointing because the town center is known for the excellent elk population. The missing elk simply give us another reason to return to Jasper someday.

Thank you so very much for taking the time out of your day to read about our adventures and view our photos. If you haven’t yet, please take a couple more minutes to follow us on Instagram and subscribe to our channel on YouTube. Take a look around our website and if you see anything you like or have any suggestions, please let us know by commenting or e-mailing us at okienomads@gmail.com.

The Icefields Parkway: Promenade de Glaciers

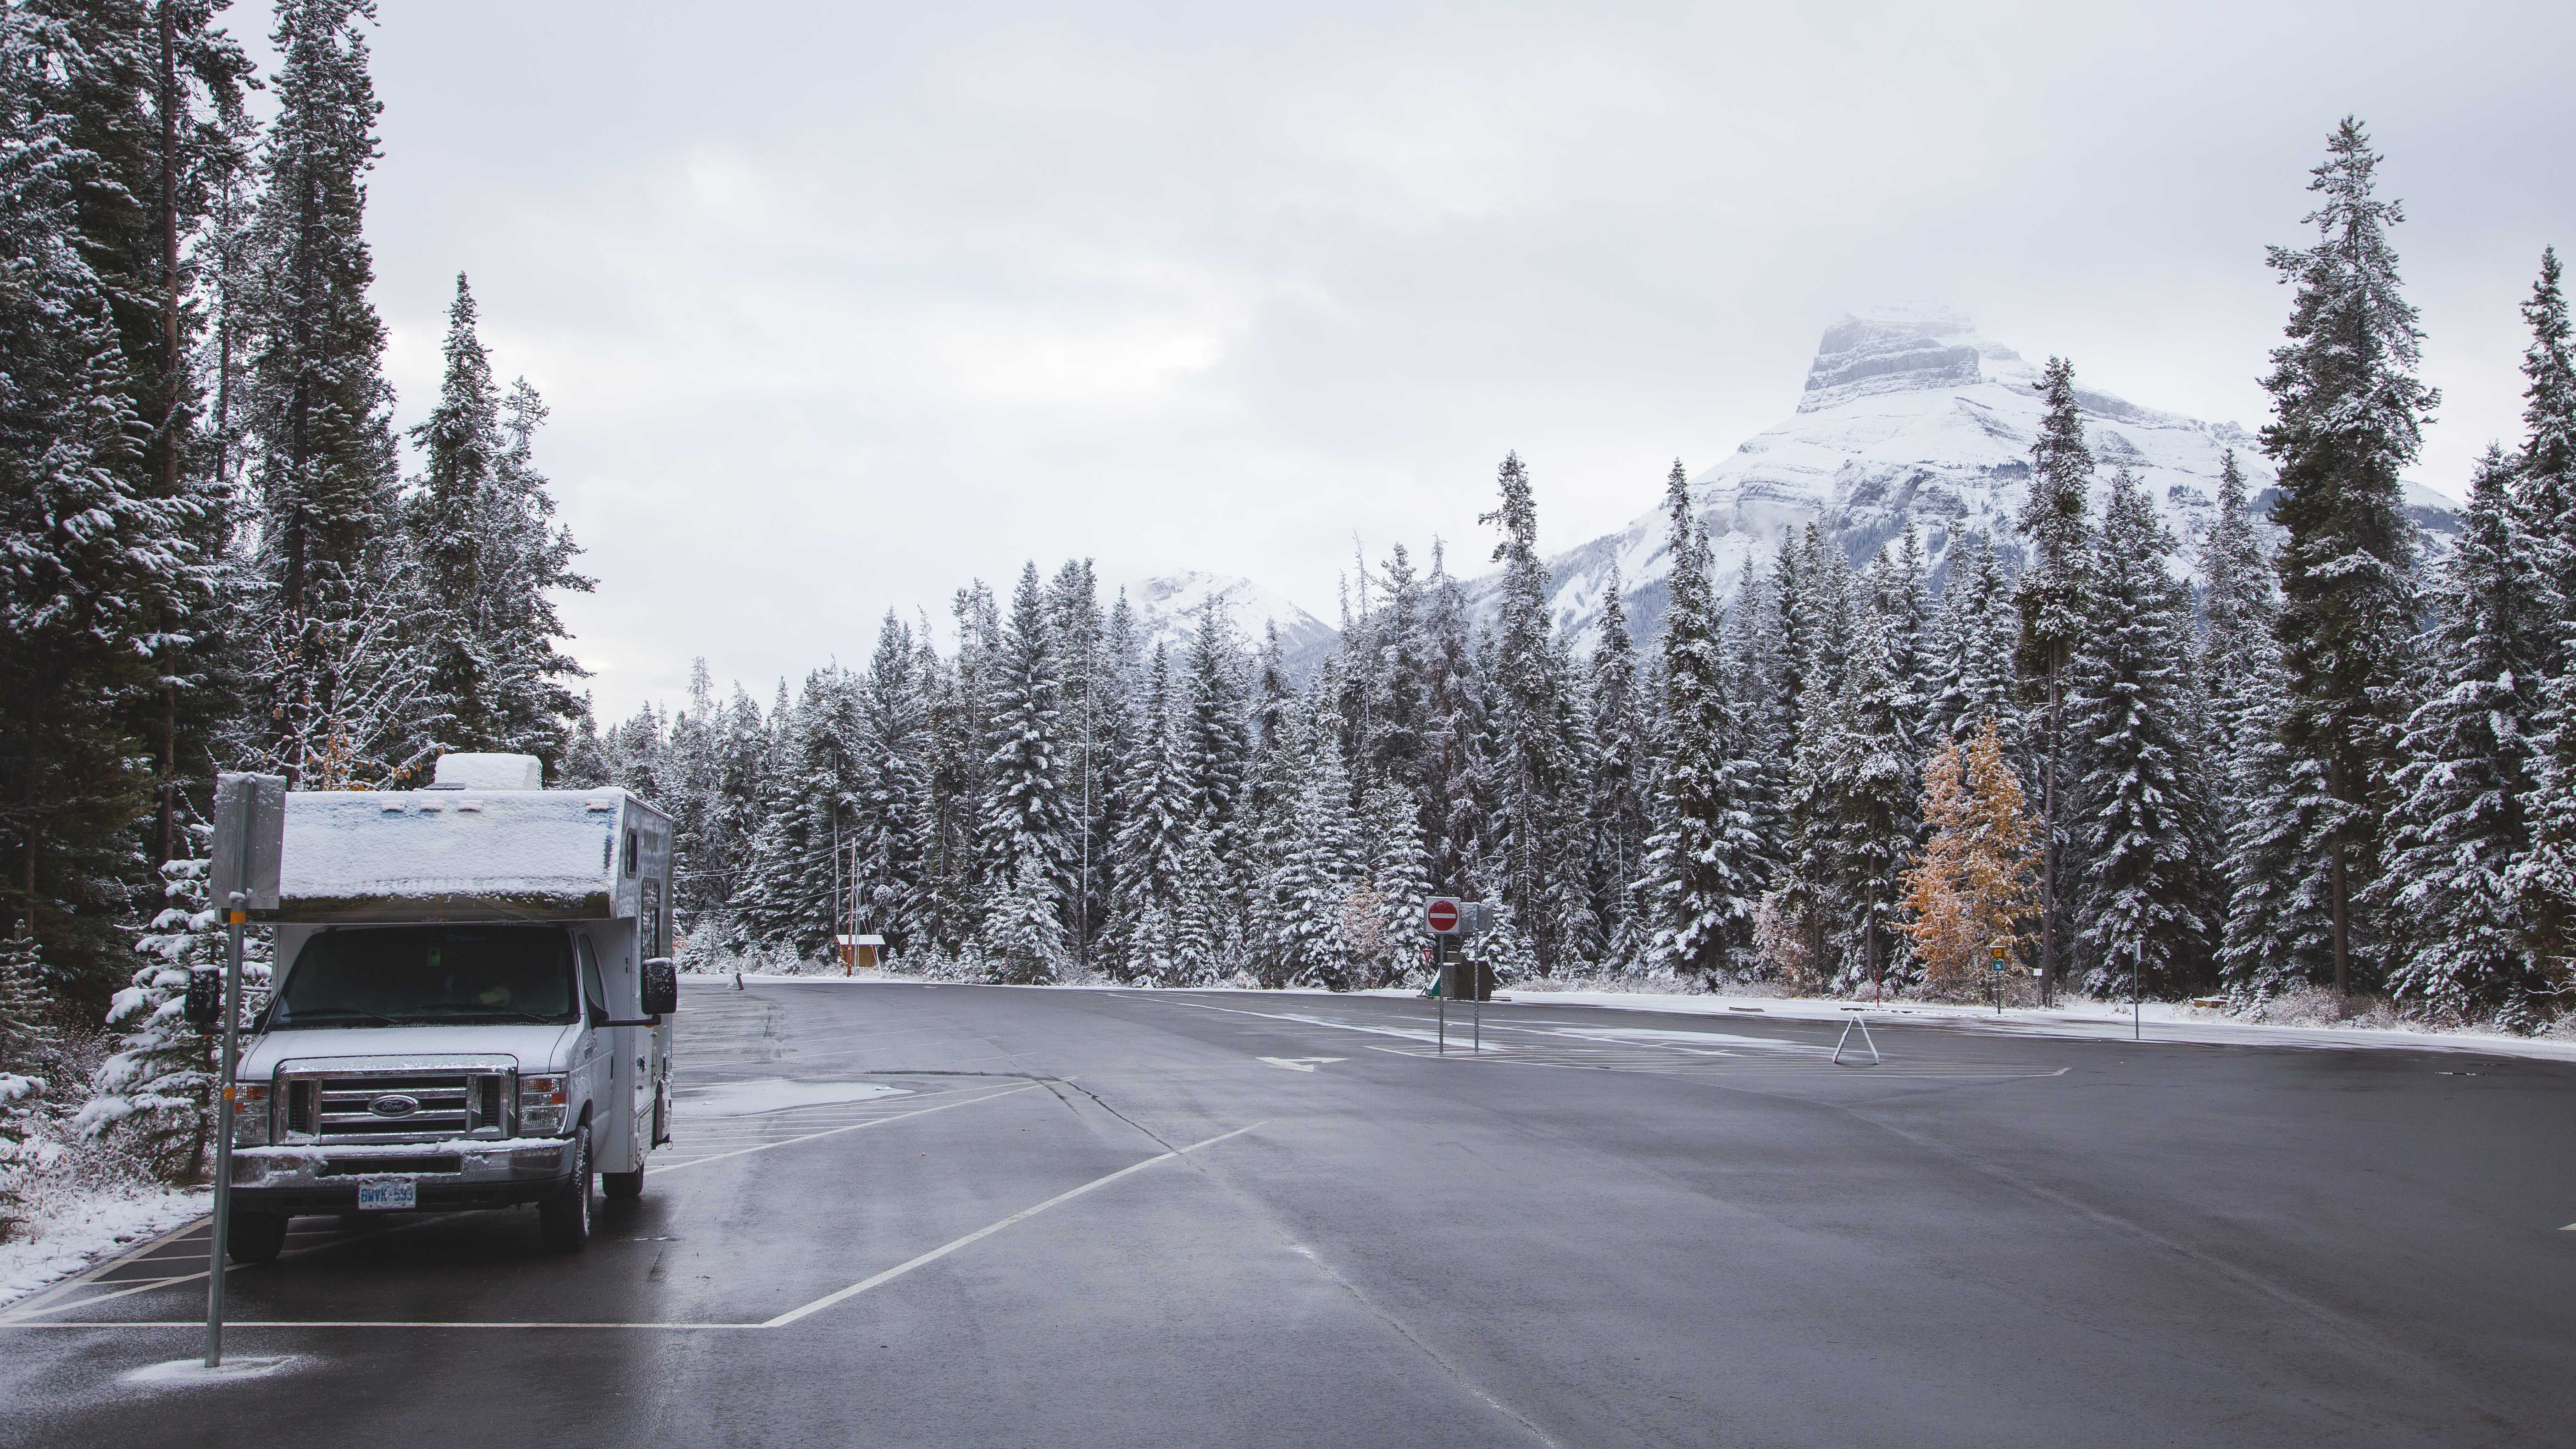
Before you read about one of the best and most iconic roads in North America, go read about our journey through Alberta in Bow Valley Parkway and Lake Louise and Banff, AB: Okienomad’s Trip Through Canada’s Oldest National Park.

Now onto this road. The Icefields Parkway is a 167 mile road that links Lake Louise to Jasper. The road winds and curves along pristine alpine rivers, over massive mountain passes and passed some of the coolest attractions in Canada.

We left out of our epic hillside parking spot and made the turn West and onto the Icefields Parkway.

Just after starting up one of the mountain passes, we were greeted by a herd of bighorn sheep crossing the road. These creatures did not remotely care that we were on the road. We let them pass and continued on up the hill.

We shortly stumbled upon the Columbia Icefield and proceeded to hike as close as we could before the crevices started. I was really taken aback by the glacier and how much it has retreated into the mountains since discovery. The date markers showing the toe of the glacier over time really convey the effects of global warming. I enjoyed the hike because of the beauty but was also humbled by the reality of what damage we have done to our planet.

On our way up the Icefields Parkway, we somehow missed the turn off for Tangle Falls. We realized it shortly after we missed the sign, but decided to come back to it on our way back South. We were not disappointed. This waterfall looked like something on a tropical island. I can’t imagine what it looks like in the summer season. We met a man here, he was actually stopping to use the facilities, and he was on his way from Alaska to Idaho, solo, in a 2nd generation Nissan Xterra. I was a little jealous of the epic distance of his trip and also very nervous for him driving through the wilds of North America through the night on his own.

We continued down the parkway toward Athabasca Falls, aptly named for the river that feeds the falls. The falls were incredible and what we missed seeing over the horizon due to the fog, we made up for in snow-covered trees bordering the river.

Racheal and I attempted to follow a trail around to the lower falls, but ended up on an old rail track and followed it a little ways into the forest. We returned to take in one more look at the falls and head toward Jasper.

This road is iconic and epic due to the sweeping views and the beautiful natural features that litter the landscape. If you are traveling the Icefields Parkway, I encourage you to take two days to see this road, especially during the summer season. If you feel like turning off and getting a picture, do it. We stopped for a lot of pictures of the road and I still wish we had stopped for more. There are so many beautiful scenes to see, TAKE YOUR TIME!

We made our way to Sunwapta Falls, a Class VI waterfall with a drop of 60ft. I would have loved to see someone ride a kayak through this set of falls as it is impressive in size and volume. I encourage you to visit this (and any other iconic sights) early in the morning. If you can be the first one there as the sun comes up, you will miss the hoards of tourists that bus in during the day. It became difficult to even setup a shot at Sunwapta due to the masses of people during the week in mid-October. Nevertheless, it was beautiful and well worth the stop.

We met the nicest woman from Ontario while we were hiking around the falls. She was visiting her son in Alberta and decided to stop at some sights along the way. Meeting people on the road is one of our favorite elements of long-term travel. We are contemplating making a business card so we can stay in touch with people that we meet on the road.

We pulled into the Jasper area close to dark, so we got the RV parked and paid for in the Wapiti Campground. Similar to Tunnel Mountain II in Banff, Wapiti is a massive campground. Be warned, during the winter months, there is not water fill or dump station at Wapiti, it is strictly an electric-only site. We were not alone at Wapiti, but the shore power and warm, clean showers were worth the $25USD that we paid to park in a parking lot with other RV’s. We will tell the story of our time in Jasper in another post, stay tuned.

Thank you so very much for taking the time out of your day to read about our adventures and view our photos. If you haven’t yet, please take a couple more minutes to follow us on Instagram and subscribe to our channel on YouTube. Take a look around our website and if you see anything you like or have any suggestions, please let us know by commenting or e-mailing us at okienomads@gmail.com.

SaveSave

SaveSave

SaveSave

SaveSave

Bow Valley Parkway and Lake Louise

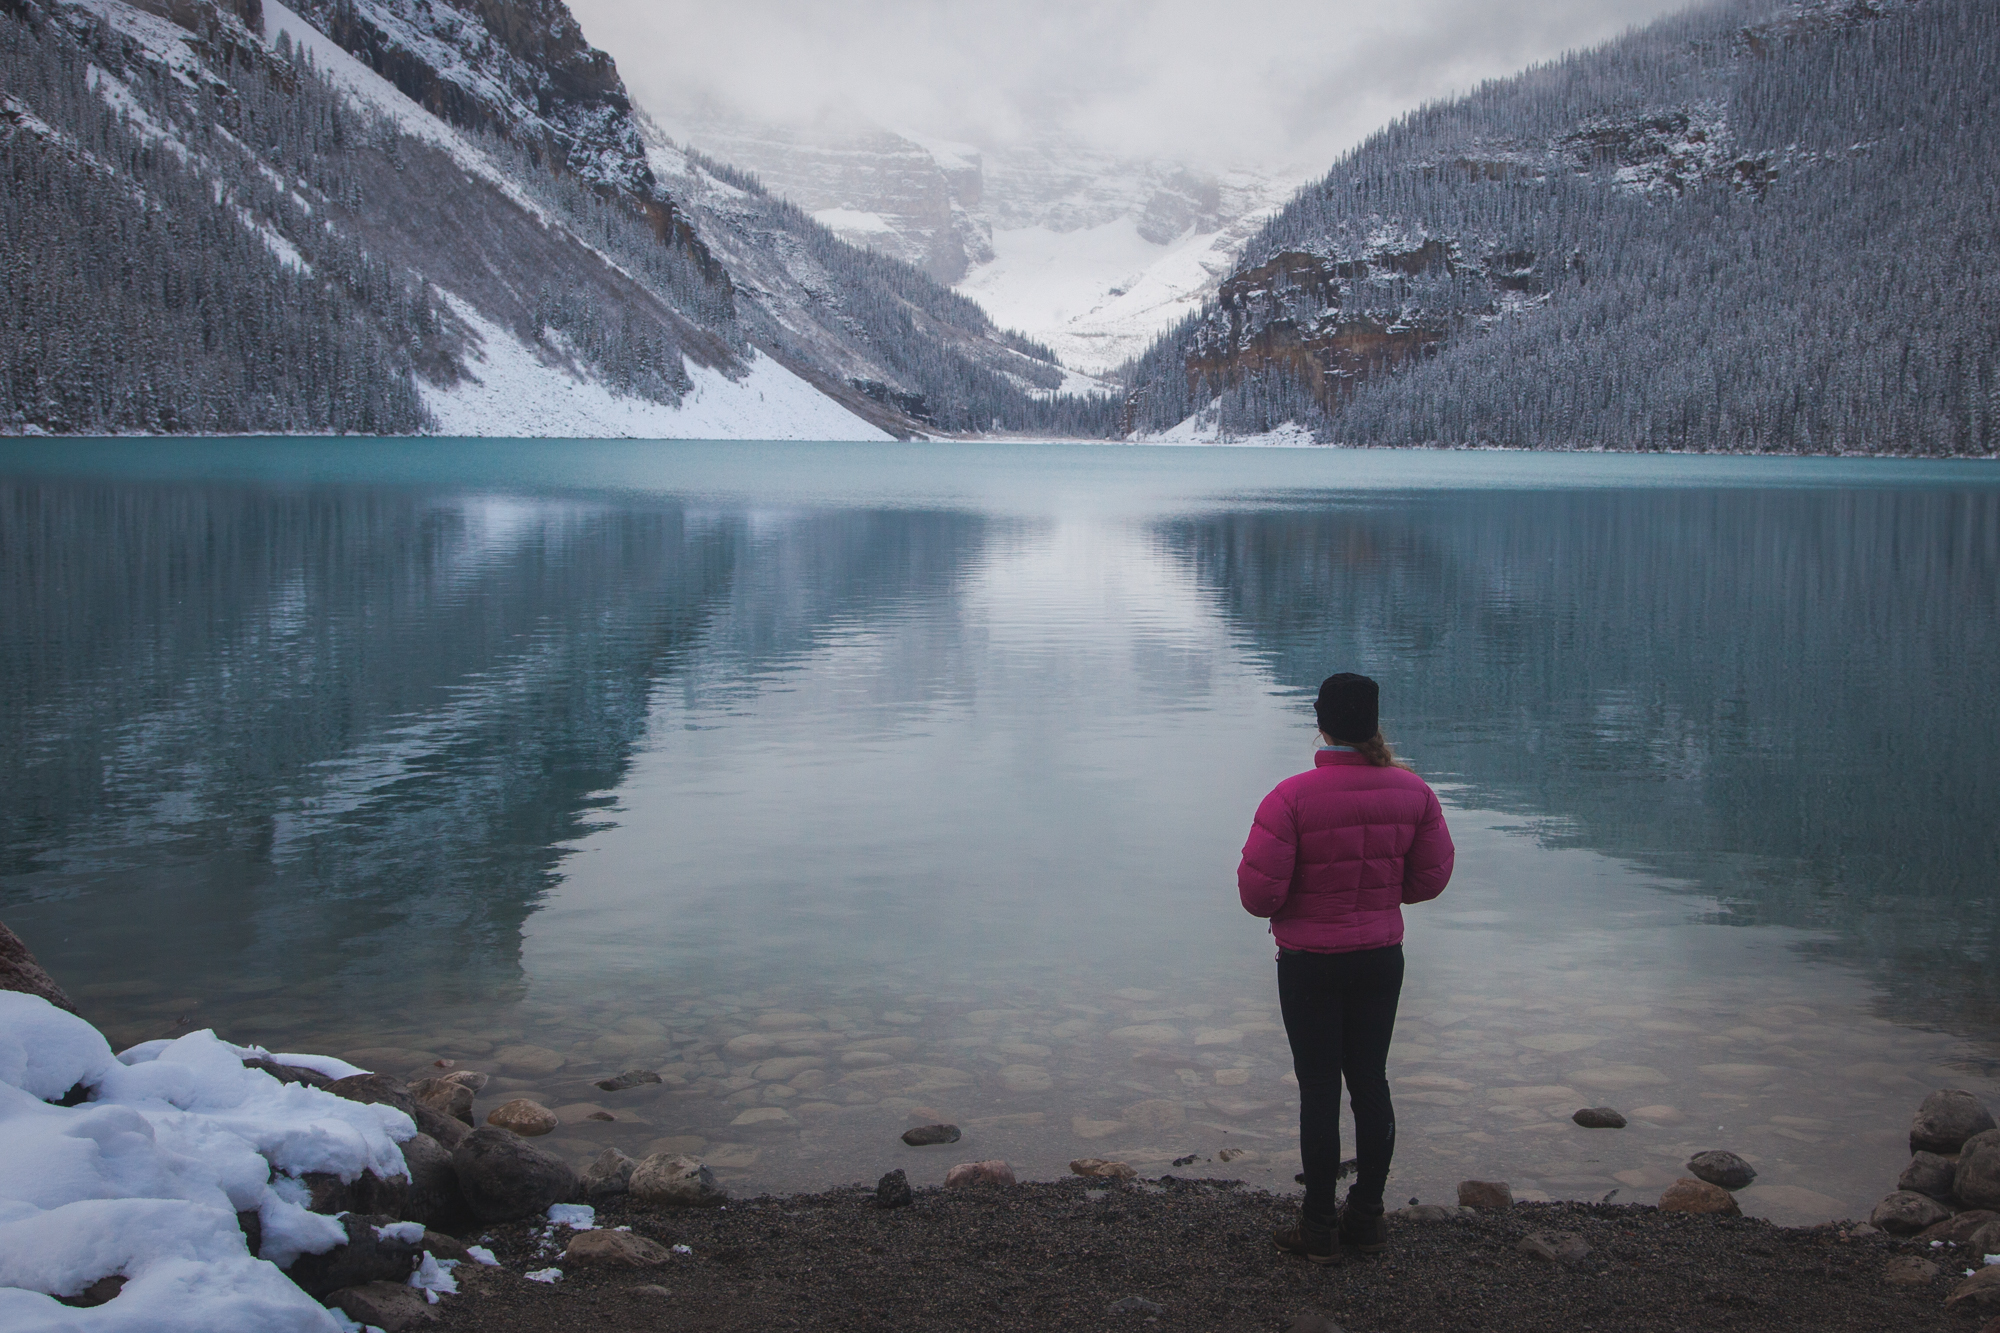
If you haven’t read the last installment of our blog, you should. See it HERE!

After a short, beautiful drive up the Bow Valley Parkway, you should arrive at Johnston Canyon. Johnston Canyon was a favorite stop for both of us. The trail is easy and well-marked and meanders along some truly beautiful cascades. The falls themselves make for an excellent place to stop and take in the view.

Zach Elseman Photography: Canadian Rockies- October 2017 &emdash;

Zach Elseman Photography: Canadian Rockies- October 2017 &emdash;

Zach Elseman Photography: Canadian Rockies- October 2017 &emdash;

A more strenuous hike leads up the mountain-side to the “ink pots”. These pools were less than interesting, but the vast expanse of the top of the forest made the hike worth it. If you visit in the fall, be sure and take some warm clothes, it was brisk up top.

Zach Elseman Photography: Canadian Rockies- October 2017 &emdash;

Zach Elseman Photography: Canadian Rockies- October 2017 &emdash;

Zach Elseman Photography: Canadian Rockies- October 2017 &emdash;

Zach Elseman Photography: Canadian Rockies- October 2017 &emdash;

We camped in the Johnston Canyon RV parking lot across the street from the trailhead. It was free and no one hassled us either night that we camped there. To see more about where and how we boondocked in our rented RV, check out our blog post here! www.okienomads.com/rvrental .

Zach Elseman Photography: Canadian Rockies- October 2017 &emdash;

Lake Louise-
This is what we woke up to the next morning…

Zach Elseman Photography: Canadian Rockies- October 2017 &emdash;

Continue travelling down the Bow Valley Parkway as far as you can and it will terminate at Lake Louise Village. Due to bad weather and visiting in October, we had to leave the parkway at Castle Junction and continue North on HWY-1. If the weather and road closures permit, take your time on this road. There are beautiful things to see all along it. Don’t get in such a hurry that you miss it.

Zach Elseman Photography: Canadian Rockies- October 2017 &emdash;

Zach Elseman Photography: Canadian Rockies- October 2017 &emdash;

Lake Louise is an interesting little village, but there was not much in the actual village that interested us. We got some advice for a “private” hike from a ranger at the information center in Lake Louise that we were glad we got.

The gentleman explained that he liked to be alone, and this is the hike he likes to be alone. We followed his directions to Moraine Lake Rd and parked at the road closed sign to continue on foot. Due to visiting in mid-October, Moraine Lake Rd was closed, but we parked at the highway and continued onto Lake Annette on foot.

We bundled up and stepped out into a fairly substantial snowfall and brought along our YakTrax in case things got sketchy. We hiked the road for a few KM’s and found the trailhead to Lake Annette, as described by our new friend at the visitor center. The trail was moderate and fantastic as it was covered in about 6 inches of fresh powder. We were the only humans that had been on it since the most recent storm.

Zach Elseman Photography: Canadian Rockies- October 2017 &emdash;

Zach Elseman Photography: Canadian Rockies- October 2017 &emdash;

We hiked a total of around 11 KM’s up to ice-covered Lake Annette and the unnamed glacier hanging on Mt. Temple. We made much better time back down the trail as we followed our original steps out of the woods. Although this is prime bear country, we saw none. We saw absolutely no wildlife on this hike, which was strange. This however was a great snow hike and an awesome experience to get into the backcountry.

Zach Elseman Photography: Canadian Rockies- October 2017 &emdash;

Zach Elseman Photography: Canadian Rockies- October 2017 &emdash;

We then made our way to iconic Lake Louise and the Fairmont Chateau that rests on the lakeshore. Although the hotel is beautiful and in a prime location for hiking and skiing in the winter, it is not really our style and definitely not in our price range.

Zach Elseman Photography: Canadian Rockies- October 2017 &emdash;

The lake, however, is beautiful. The mountains in Alberta seem to burst out of the lakes and erupt into the clouds. So is the case for Lake Louise. The emerald blue water is like nothing I have ever seen. We walked around the lake and took in the sights, conversed with some very nice tourists, took obligatory shots of the boathouse and made our way back to the RV for lunch.

Zach Elseman Photography: Canadian Rockies- October 2017 &emdash;

Zach Elseman Photography: Canadian Rockies- October 2017 &emdash;

Zach Elseman Photography: Canadian Rockies- October 2017 &emdash;

A lot of the popular trails either had roads closed to the trailheads or were socked in with snow, so we missed some of the more iconic hikes at Lake Louise such as the Plain of Six Glaciers or Moraine Lake. We will save those for another trip.

North of Lake Louise, the Bow Valley Parkway turns into HWY 93, the Icefields Parkway. One could spend a few days travelling the Icefields Parkway by itself, and we will leave that to a later post. Thank you for taking time out of your day to read about our adventures. If you enjoyed the stories or the photos, let us know by leaving a comment or sending us an e-mail at okienomads@gmail.com. You can see all of our images on Instagram and videos of our bus build on YouTube. Subscriptions, shares, and follows are always appreciated, they help keep this dream alive.

Gluten Free: 5 Tips for Eating GF on a Road Trip

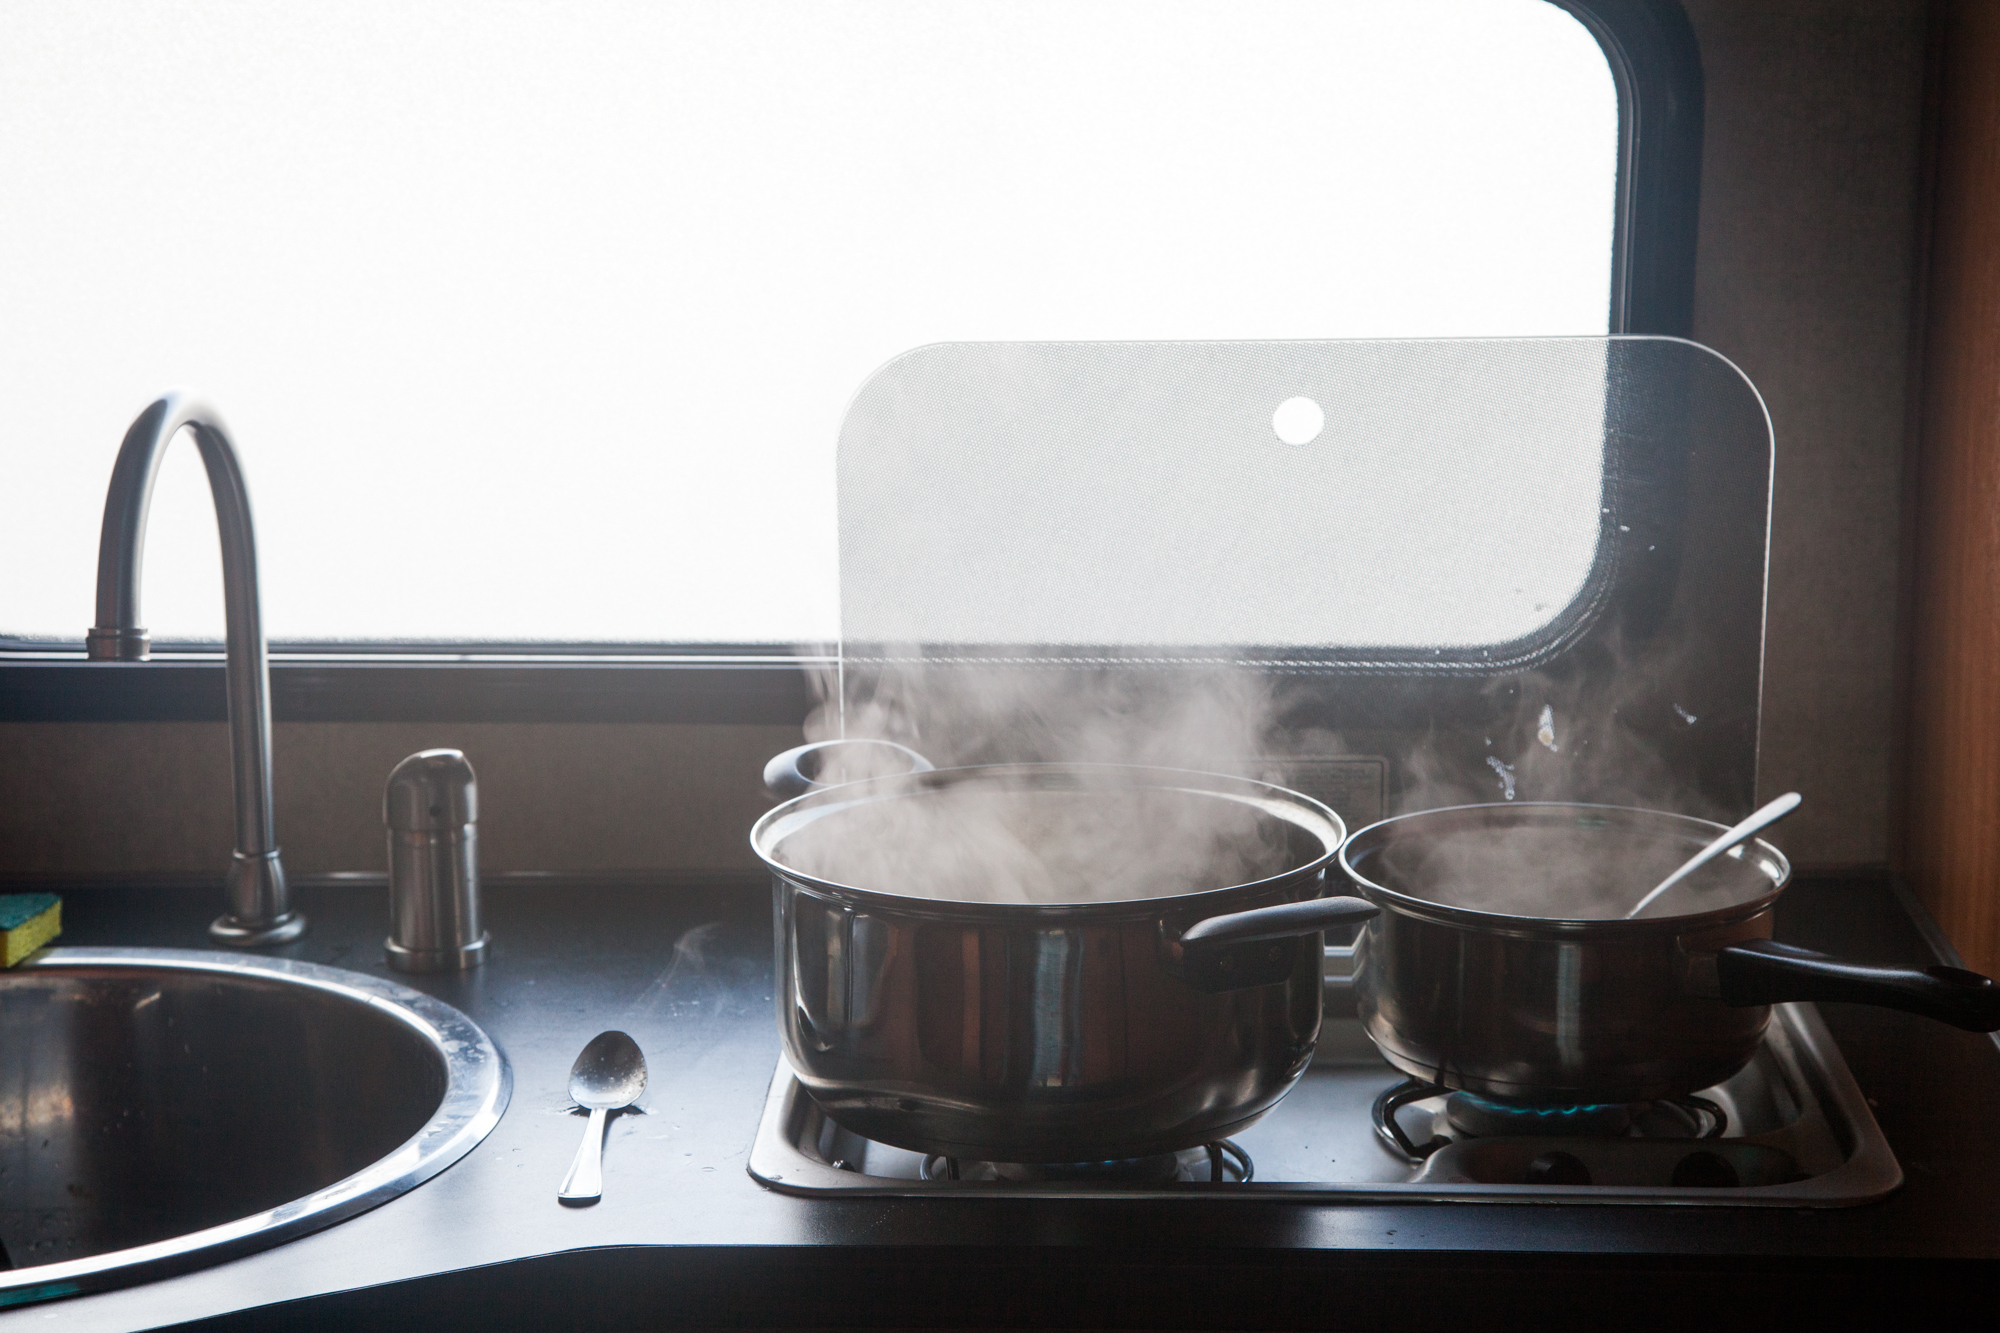
One of our biggest challenges on road trips is eating healthy and gluten free. Rachael has a gluten intolerance that makes digesting wheat a truly miserable experience for both of us, but mostly her. I can eat Gluten, but my digestion is greatly improved when I kick wheat out of my diet. So how do we do it? We travel all over the country staying in campgrounds, Air BnB’s and backcountry campgrounds in the middle of nowhere and we always have to eat.

Below are some tips that will help you eat Gluten Free on the road or in the woods:

  1. Use Gluten Free Apps- There are countless apps that are available for free or cheap on Android and iOS that will point you in the direction of GF restaurants in your area. The app we use most is Find Me Gluten Free. It has over 100,000 downloads from the Google Play Store and it has been very accurate for us. Simply type in the location that you are searching and navigate the list or map for results. Be advised that in very large cities like, the results can be overwhelming; try zooming in to your neighborhood or street for accurate results.
  2. Embrace the Art of Cooking- If you are new to a Gluten Free lifestyle, you will need to embrace the fact that you will need to learn how to cook. Eating out is not only less healthy, but it is extremely expensive. It is especially expensive when you are on a road trip budget. Before we get setup at any campsite or take off on any trip into the backcountry, we create a menu and meal prep. Keep an eye out as we will be posting Gluten Free recipes very soon on the blog.
  3. Zach Elseman Photography: Buffalo River, AR: September 2016 &emdash;  Shop Before You Leave- If you know that your regular grocery store stocks GF bread and all of the ingredients that you will need to make your favorite camp dish, don’t wait until you get to Pond Creek, OK to see if the 7-Eleven attendant has any idea what Gluten is. Plan your meals ahead of your departure and buy your potentially hard to find items before you embark.
  4. Pack Snacks- Not only is eating small meals throughout the day a healthy choice, but it gives you some flexibility when it comes to eating Gluten Free in unfamiliar places. By packing a snack such as fruits, vegetables, or trail mix, you give yourself a back-up plan in case you can’t find a meal on the road. On our most recent trip to Canada, we flew with a 5LB bag of Kar’s Trail Mix and ate it over the course of two weeks in the Great White North; we didn’t have to worry about getting glutened by a mystery trail mix in Yoho National Park. To see more from that trip, check out our post about the start of that trip here.Zach Elseman Photography: Canadian Rockies- October 2017 &emdash;
  5. Take Your Time & Stay Longer- In my limited time traveling and living with a person that has a gluten intolerance, I have found that the less rushed we are and the longer we stay in a particular area, the more likely we are to find quality Gluten Free offerings and the more accommodating grocery stores in an area. Conversely, the more that we rush while traveling or in our day-to-day, the more we slip up on eating well.

Thank you for taking the time out of your day to visit our site and to read our content. We greatly appreciate it and we want to hear from you. Please leave us a comment on the blog, send us an email at okienomads@gmail.com, or find us on Instagram, Twitter, and YouTube @okienomads.

Canadian Road Trip: Getting to Canada

The easiest and least complicated aspect of our recent trip planning was arranging to get into Canada from the US.

Did you know: American Citizens can visit Canada for up to 180 days before other arrangements such as Visas have to be arranged? Crazy! All of this natural beauty and all of these super friendly people and the government doesn’t care if you spend 6 months across the border. AWESOME!

The backbone of our whole trip was finding an affordable international flight that left near our wedding and arrived when we needed to be back. We used Expedia.com for our flights and found a cheap flight out of XNA in Northwest Arkansas and a return flight to Tulsa International.

Okienomads Travel Tip #1: Always check-in to your flight before you get to the airport. If the plane is empty, you will probably get to sit by your travel companion. If it is full (like our return flight from Calgary) you will get stuck between two strangers.

Once we arrived in Calgary, we made our way to our first Air BnB for our layover for Canadian Thanksgiving. MJ was a fantastic host and we could not have asked for a better place to relax and recharge before hitting the road. The apartment is furnished well and the hot-tub was a great addition. The location was great for walking all over Downtown Calgary. I would highly recommend this for anyone looking for an alternative to a hotel room.

Zach Elseman Photography: Canadian Rockies- October 2017 &emdash;

On our return trip through Calgary, we stayed here. Justin was also a great host and was even there to let us in when there was a malfunction with the buzzer at the front door. The building is a historic brick building in the heart of Downtown Calgary. The layout was a little unique, but it worked great for two road-weary travelers.

Calgary has plenty to offer in the way of food and shopping, there was however, limited nightlife. We are not big into nightlife or bars, but we did notice that it was a little dead after about 10PM. We found no shortage of food options and even found some that accommodated with gluten free options. Below are a few of our favorites:

  • Yellow Door Bistro/119 12 Avenue SW- This cafe was a bit overpriced, but the Sunday brunch was very good. The service was excellent and the waiter even helped us plan out our day of walking around the city. I probably wouldn’t eat hear again, simply due to the price tag, but if someone else is paying, its great!
  • Pho Hoai Vietnamese Noodle House/132 3 Ave SE- Want to eat at the best Thai food that is open on Thanksgiving? This is it. The food was excellent, cheap, and authentic. The owner explained that her special sauce is hand made from scratch daily. The location is a little tricky as it is in a strip mall in Chinatown, but it was tasty.
  • Sweet Tooth Rolled Ice Cream/206 Center St SE- Talk about a hidden gem! This ice cream parlor rolls their ice cream right in front of you and delivers a delicious final product. The ice cream artisans were extremely friendly and super nice. I would highly recommend this place during your stop in Calgary.
  • Michael’s Pizza/139 10 Ave SW- The google reviews speak for themselves, Michaels was excellent pizza! They make their pizza with farm-fresh ingredients and deliver anywhere downtown. They also have a gluten free crust that was pretty good.

Zach Elseman Photography: Canadian Rockies- October 2017 &emdash;

Zach Elseman Photography: Canadian Rockies- October 2017 &emdash;

Calgary has a lot to do, especially if you are short on time in the city. We really enjoyed spending quality time walking the trails around the Bow River and exploring the different neighborhoods in and around Calgary. If we had a little more time, we would have taken a trip out to the Calgary Olympic Park. Our schedule did not support this however, so it will have to wait until next time. We got a hold of our RV and our next stop was Banff National Park. To learn more about our experience with Cruise Canada and a rental RV in general, click here!

Zach Elseman Photography: Canadian Rockies- October 2017 &emdash;

Next Article: BANFF, AB: OKIENOMAD’S TRIP THROUGH CANADA’S OLDEST NATIONAL PARK

If you don’t follow us on Instagram, Twitter, and YouTube please take a second out of your day to follow and subscribe. The more followers we have, the easier it is to post more content from amazing places. Thank you to all of you that follow along, I hope you continue to enjoy the journey. If you have any questions or comments, please leave them below or e-mail us at okienomads@gmail.com.

Travel on the Cheap: FAQ and Review of Renting an RV to tour the Canadian Rockies

When we started brainstorming options for our Honeymoon, Rachael and I were both unaware of how much adventure we could cram into two weeks by renting an RV and road-tripping through the Canadian Rockies.

Why Cruise America (Canada)?

We researched a few other RV rental companies (Canada Dream mostly) and they were more expensive and not nearly as flexible with dates and costs. We got a seasonal deal with Cruise Canada (same company as Cruise America) and it cost us almost half as much with CC as it would have with Canada Dream.

Why an RV?

Cost. One alternative is to camp, but campsites are around $12-20/night not to mention the cost of renting camping equipment that could withstand the cold of October in Alberta which ranged anywhere from $20-100/night which isn’t any cheaper than the RV. The RV cost us just under $1000 CAD after renting pots and pans for the 8 nights. Hotels in Banff and Jasper averaged around $150/night not to mention the cost of a rental car or shuttle to drive us to cool places. In the RV it was one cost for the whole trip and we only had to worry about one reservation.

Convenience. Everything was in the RV! Just like when we travel in the bus, all of the things that we needed were tucked away in the RV, ready for any hike or adventure that arose. We could go from sleeping to hiking in a couple of minutes and the RV was secure and safe anywhere that we visited in Alberta and British Columbia. All we had to pack was a sleeping bag and we were set!

How terrible was living in an RV for over a week?

You are asking a couple who want to live full-time in a school bus, but past that, the RV was great! Everything worked and was clean when we picked up the unit. We used the propane stove and heater throughout the whole time we were in the rig and it worked flawlessly. The refrigerator ran off of electric and propane and we only refilled the propane tank once to the effect of about $25CAD.


The RV only had 100k miles on it and appeared to be basically new. It drove fine for as large of a vehicle as it was and we only had to put air in 1 tire on one occasion. We literally just drove it, slept in it, and took it back.

How brutal was dealing with Cruise Canada (America)?

I too have read some of the reviews online about Cruise Canada and I was initially very skeptic. I had planned to walk around the whole rig with a GoPro filming all of the little problems and blemishes, similar to the experience of renting a cheap apartment in a college town. However, our experience with CC was very good. Customer service was right on and we spent a total of about 20 minutes at their location, total. The check-in was fast and painless. Below are a couple of tips to help your process go smoothly:

  • Don’t plan on starting your rental on a weekend. We started and ended our rental on a weekday and we hardly saw anyone else at the location.
  • Have all of your paperwork in order. Make sure that you watch the safety video that they send to you ahead of time. And provide all of the needed licenses and agreements when you get to the counter.
  • Be familiar with the general operation of a Recreation Vehicle before you rent someone else’s $60,000+ rig. Understand how propane, electric, and water systems work. It’s simple.

Do you have to stay in Campgrounds?

Yes and no. To use the 110V appliances like the AC unit and the microwave, you must be connected to shore power in a campground or driveway. The rest of the appliances/lights/etc are 2-way, meaning they can run on the “house” battery for a short period of time. We only paid for camping 2 nights out of the 9 that we stayed in the RV.


Look for highway turnoffs, abandoned parking lots, and free RV parking signs and eat your heart out. One of our favorite nights of the trip was in a “Free RV Parking” area at the Crossing Gas Station/Motel/Pub.

Where did you poop?

This is a super common question that we often get with the bus life and the answer is the same, public restrooms and the woods are everywhere, especially in Canada. We did not use the RV washroom for #2 once. We utilized the always present forest or public restrooms when were near a city or town. Just think of how many trailhead, coffee shop, visitor center bathrooms that you see every day of a trip. Now just plan your day a little bit ahead of time and you too will not let the poo control your adventures.

Bonus tip: Always bring TP. An extra roll of toilet paper can save the day. We bought a small 4 pack when we landed and donated what was left to our AirBnB host in Calgary before we flew out…A small price to pay for comfortable BM’s.


If you have ever rented an RV and had a hack or suggestion that could help us the next time we rent, please drop a comment or e-mail us at okienomads@gmail.com. As always, keep up to date with our adventures on Instagram and YouTube @okienomads.

SaveSave

SaveSave

SaveSave

Next Article: Canadian Road Trip: Getting to Canada

What to Pack for a Canadian Adventure-Gear Load-Out for Banff, Jasper, and Yoho National Parks

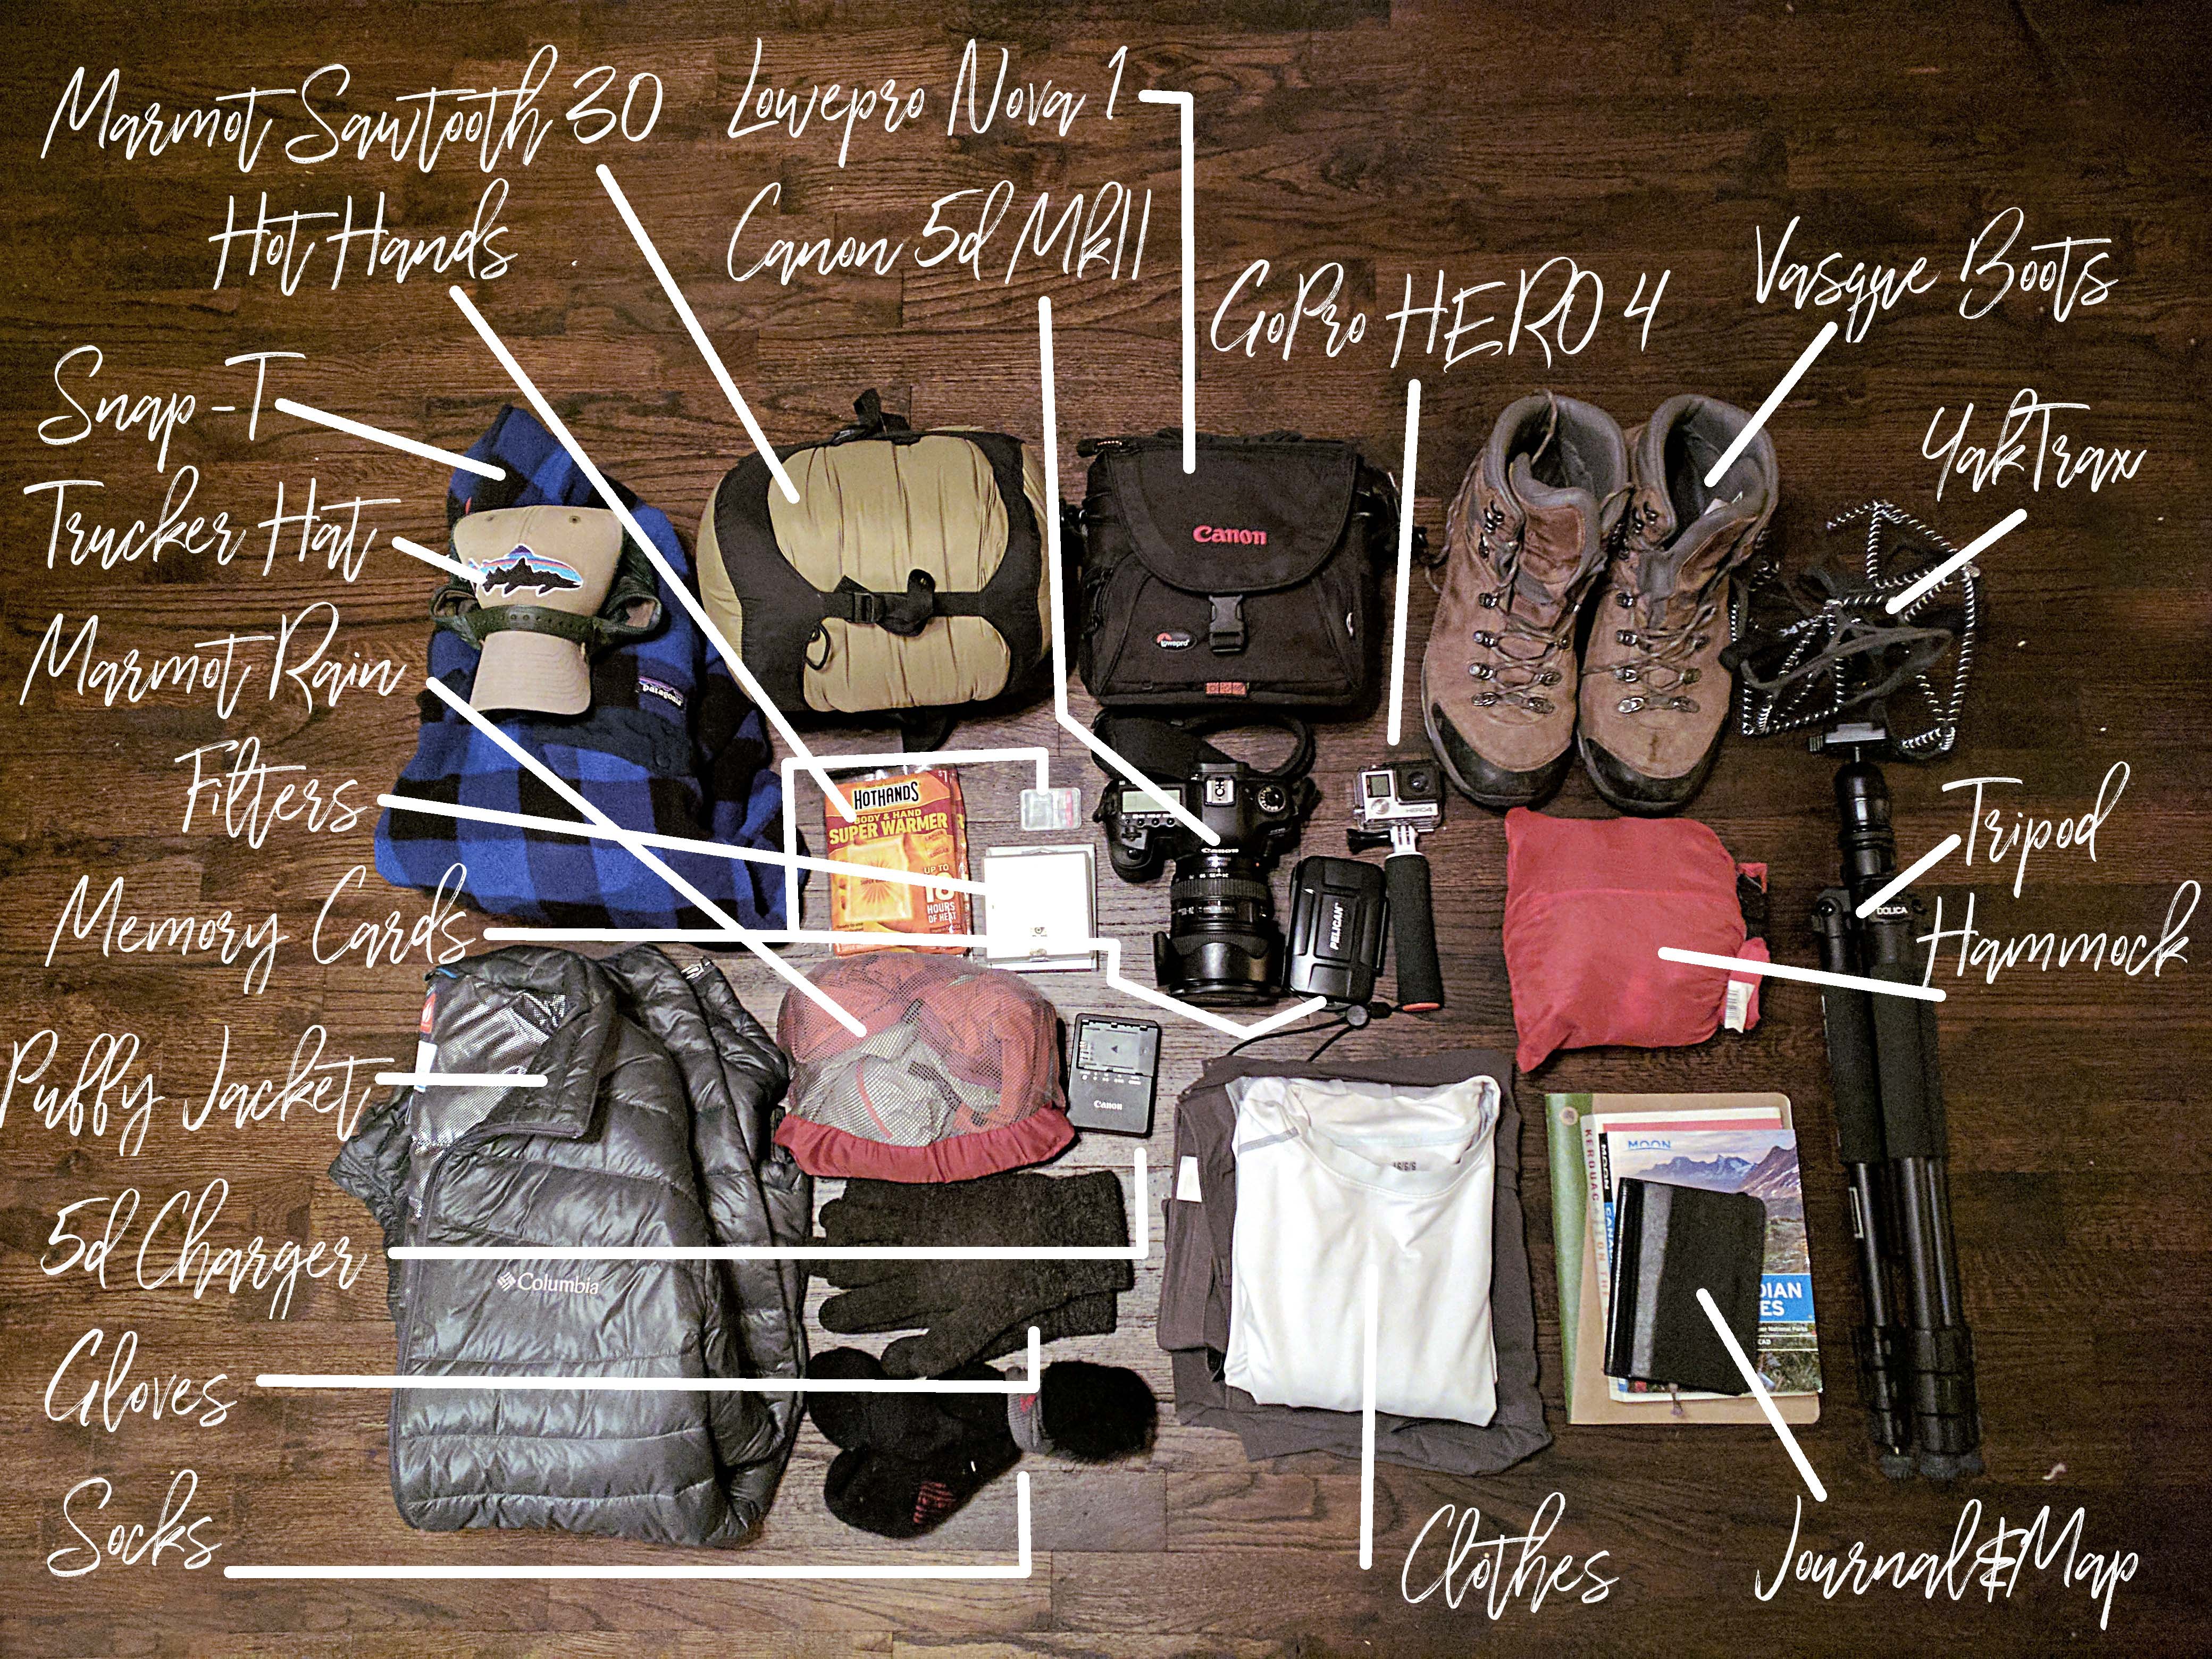
One of my favorite aspects of any adventure is the preparation. The route planning, researching local attractions and trails, and packing enough gear to survive and enjoy ourselves, but not so much that we can’t comfortably move in and out of airports, campsites, and local establishments. By the time this post goes live, the Okienomads will be married and on their way to Calgary, AB for a road trip through the Canadian Rockies in areas including Jasper, Banff, and Yoho National Parks. But what do you bring for an adventure in the Canadian Rockies when you plan on living out of an RV and hiking some of the most beautiful trails in North America?

Clothing

Needless to say, we will need to dress warm. We plan on hiking and exploring nearly every day while in “The Great White North”, so warm, synthetic layers are a must. We have a trail race when we get back stateside, so we will need to get in a couple of runs in Calgary and when we travel further North, so we will need a couple of pairs of shorts and the running shoes.

For the colder nights in the RV, tights, gloves, and the down jacket will be huge if we run out of propane or if temps drop below freezing for too long. We opt for wool socks for obvious reasons to keep warm and stay dry.

I am not going to lie, I could wear my Patagonia hiking pants every day of the year and be happy as can be. I am packing a pair of jeans and a decent shirt in case we go out to eat or out on the town for the evening, historically, the jeans will stay in the bag for most of the trip.

Swimsuit is in the bag for the Air BnB in Calgary and the hot springs along the way.

Photography Gear

We couldn’t possibly travel to one of the most beautiful parts of the world and not take my camera and some gear to capture these amazing sights. I wanted to avoid taking a laptop as we would be leaving the RV unattended during most days in some very remote areas of Alberta and BC. Instead I am bringing the bulk of my CF memory cards for the 5d to avoid uploading until we get back. I think over 100 GB should be enough even with video files. The GoPro will tag along for time-lapse and hazardous condition shots and video with around 100 GB of memory as well. If you can’t tell, I don’t like running out of storage space while in the backcountry.

The Dolica tripod is a new addition to the gear list and I hope it works out better than the cheap tripods that I have used in the past. The tripod weighs 4 pounds and folds down to a 2ft length so it will make carrying on the airplane and on hikes a breeze. Reviews are excellent and the price can’t be beat at $50. With the chance of a Grizzly mauling or it falling into a freezing, glacier fed stream, I didn’t want to chance losing a several hundred dollar tripod. I will post an in depth review when we get back, but initial impressions are good!

The Circular Polarizing Filter is needed to cut down snow and water reflections as well as maintain blue skies and clouds. The Neutral Density Filter will be used for waterfalls and other exposures needing long shutters.

I opted to leave the drone at home for a couple of reasons. First, we are traveling on our honeymoon, I don’t want to spend a romantic trip with my new wife flying a hive of angry bees over scenic Banff. That doesn’t sound like fun to me. Second, because of the size. I love my drone. The 3DR Solo is great for the type of work that I use it for. However, it is huge! It would be a carry-on by itself. If I had something like a DJI Spark or Mavic that folds down small and can still record quality video and stills, I might consider lugging it around.

Other Miscellaneous Gear

Just when I thought we had everything that we needed for an expedition to Canada, my bride surprised me by picking up a pair of YakTrax for both of us. These simple devices improve traction on snow and ice and will be perfect for post-holing snow packed trails and scurrying across glaciers. There are a million reasons that I love this woman, and spontaneous & surprise gear purchases rank in the top 100 reasons for sure.

We are both packing winter sleeping bags as I am not confident in the insulation of a rental RV in the Canadian Rockies in October. I will also pack a bag liner to add a little extra warmth to the sleeping arrangement. Travel pillows will more than likely fly in the carry-on and be used heavily in our Houston layover.

In order to get all of this gear on an airplane and across the continent we need some luggage. My clothing will be packed in an old REI duffel that has been on many adventures. My carry-on is a Patagonia Refugio 28L day pack. This day-pack has been my go-to since my 2nd year of college and carries my camera bag in the bottom, jackets on top, maps, chargers, and a book/journal, and passports in several well-designed pockets and a tripod in one side pocket with a Nalgene in the other side pocket.

Rachael uses a NorthFace Base Camp Duffel as her checked bag and an Osprey 35L backpacking pack as her carry-on. If I know her at all, her checked bag will have plenty of clothing and shoes for any adventure that we might find and her carry-on will have her e-reader, plenty of snacks, and warm layers for her to stay warm in the freezing airport, plane, or public transport.

What gear do you use when you travel? Comment on the blog or reach out to us on Instagram and YouTube as @okienomads. We love hearing from others traveling and trying to make things work in this lifestyle.

SaveSave

SaveSave

error

Enjoy our content? Help spread the word! ;)

Follow by Email
YouTube
YouTube
Instagram