Staying Connected and Working Remotely

Remote working in Santa Fe, NM in 2020

During most of our travels around North America, we have worked online as our primary source of income. Our employment has required that we be connected 3-4 days per week during the heavy times of the year and 2-3 days during the slow weeks. This demand on our time has necessitated that we stay connected to the internet far more often than we would prefer, scroll down to find out how we stay connected while living in our skoolie!

Continue reading “Staying Connected and Working Remotely”

Oregon FREE Camping-Boondocking in the Beaver State

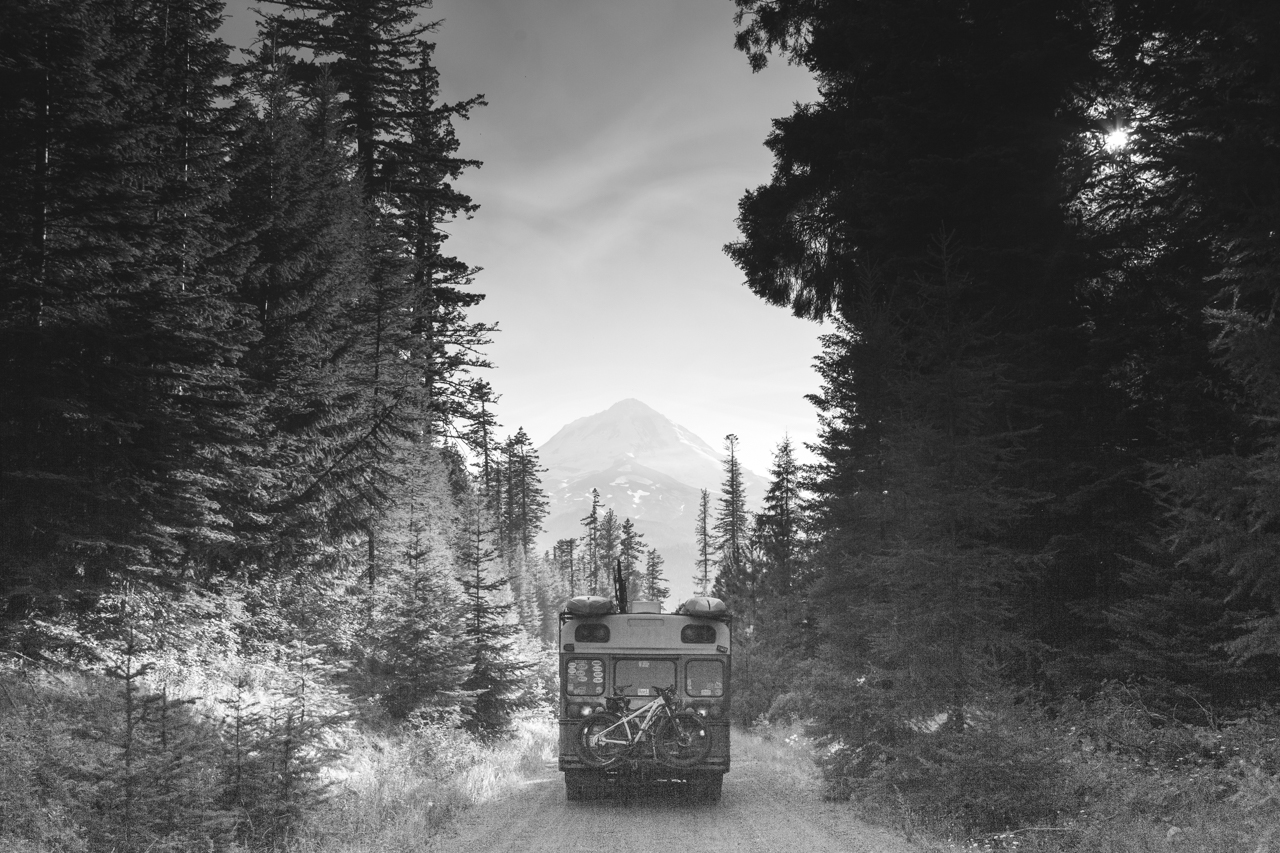
Free Camping in Oregon was as easy as we expected but not nearly as beautiful as we had thought. These campsites, however, allowed us to explore so many different parts of this amazing state without ever paying for a campsite. One thing to consider in Oregon is that the beach is public land, if you can get to it, it’s free game for boondocking. We are not equipped for driving through deep sand, so we avoided the beach. Your mileage may vary.

Coquille River Boat Launch

Bandon, OR

GPS: 43.163189, -124.362145

Nestled back in the corner of quiet Bandon, this boat launch parking lot is a perfect spot for a good night’s sleep and exceptional wildlife viewing. We were 1 of 3 rigs parked here on a Sunday night and all was quiet. A government research boat was parked there when we were and it looked to have been there a while. Seemed like a very safe and calm spot to boondock.

There are vault toilets and picnic tables near the launch and great access to the Coquille River a few miles before reaching the coast. We used this spot to investigate the nearby mountain bike trails close to Bandon.


Dorena Mining Camp

Dorena, OR

GPS: 43.627432, -122.703511

This little pull-out along a scenic back-road was a peaceful spot to relax and prepare for entering Eugene. Miners use this pull-out to pan and dredge for gold and black sand and have left several deep pools in the creek that are perfect for swimming.

Campsite on Arrival

The site was in poor condition when we arrived with shell casings and trash everywhere. We picked up and you should to. Trashing out such a beautiful area is really sad. We left it better than we found it as did the locals that hung out for a while.

Campsite at Departure


Phil’s Mountain Bike Paradise

Bend, OR

GPS: 43.970190, -121.513552

The heart of Bend’s Mountain Bike Mecca is the Phil’s System and there is Forest Service Camping all around the area! This spot was right off of the trail and really pleasant. This is a true boondocking spot with no services, but we really enjoyed getting to ride and explore this area.


Oakridge Green Waters Rest Stop

Oakridge, OR

GPS: 43.739128, -122.459006

This is a rest stop with flush toilets and river access. This lot is near the highway, but the noise wasn’t bad. The facilities were clean and this location is in close proximity to town and nearby mountain biking trails.

We tried several boondocking spots near Oakridge and got an uncomfortable vibe from most of the locations, near the railroad tracks. The rest stop was well lit and seemed much safer. There is a park adjacent that hosts music festivals in the Summer and Fall.


Evergreen Air & Space Museum

McMinniville, OR

GPS:  45.204028, -123.142602

Talk about a unique camping spot! Dry camping is offered for free in the back lot of the Evergreen Air & Space Museum. Parking is amongst airplanes and helicopters in a quiet corner of the property. Bathrooms are open during business hours and there are no facilities after the museum closes.


Hood River Dispersed Camping

Hood River, OR

GPS: 45.419751, -121.530729

Hood River is a treasure trove of dispersed camping! We found a spot out in the middle of nowhere and we really enjoyed our time there. It was quiet, wild, and fairly easy to get to.

Remember to Pack-it-in and Pack-it-out when wild camping in National Forests and insure that your campfires are fully out.


Lumber District Sand Dunes

Coos Bay, OR

GPS: 43.400069, -124.288338

This campsite is one of those instances where 4×4 and recovery equipment would have been ideal. The sand dunes near Coos Bay are beautiful and vast, plus entirely unreachable by our Skoolie. We camped at the trailhead and walked around the are. It was fairly quiet until the timber company down the block started work at 5:00AM.

There are no facilities here and it can get busy and full on the weekend. Some cars were left overnight with no problems. Much better and more affordable than the $75 KOA a few miles away.

New Vlog Post: SOLAR, SOLAR, SOLAR- Okienomads Skoolie Solar System Walkthrough

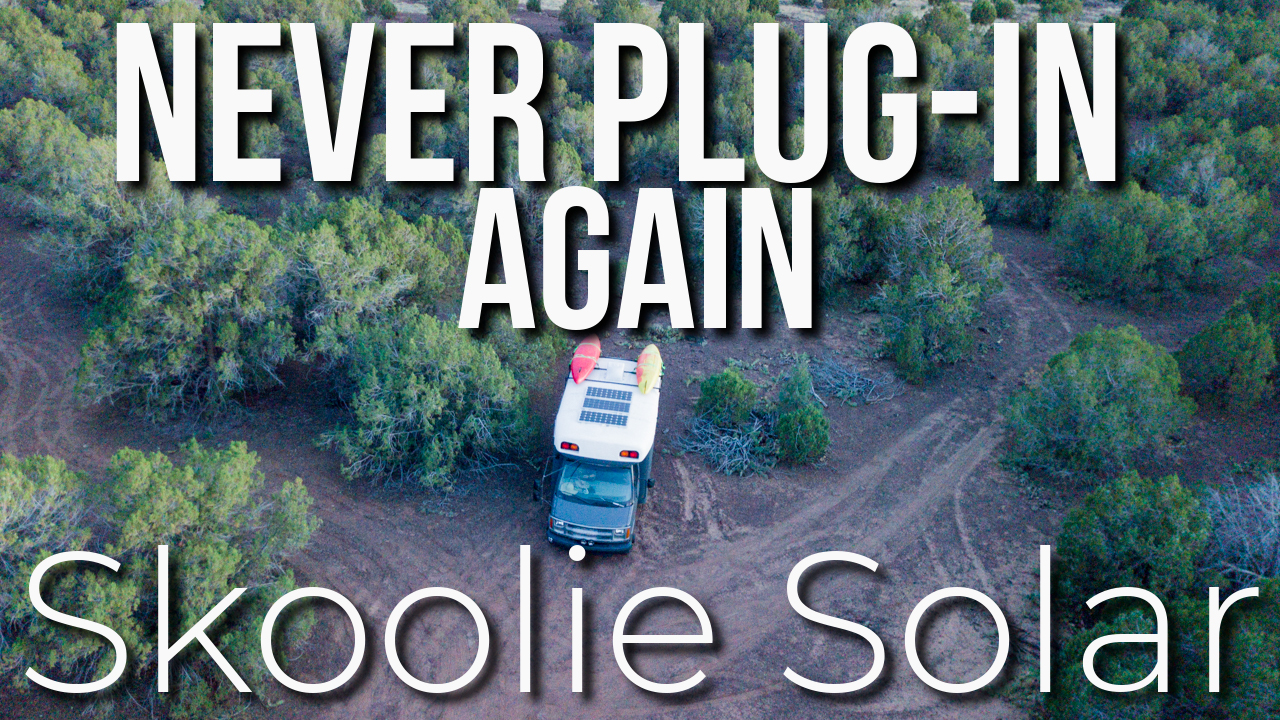
We have posted a new video walking through the solar system installed on our Skoolie conversion. In our video we show you how and where everything is installed in our system.


If you want to see the gritty details of our system, we have published a blog post outlining the details of our skoolie solar system. You can check out that article below:

Skoolie Solar System Blog Post

Thanks for watching and reading along with our adventures, we really appreciate it!

Fresh Paint…Maintenance Monday on YouTube

We painted our bus in a hurry and ended up with a really good looking paintjob thanks to help from my grandparents, parents and Rachael’s parents. It was a team effort and it transformed the bus from a creepy former school bus to a shiny adventuremobile.

Before


After

Unfortunately, we left without finishing the paint job on the bus and left the front grill ugly and grey. We found a little time to repaint the grill and we posted a video showing you how we did it. This process will work for most plastics on cars, trucks, and RV’s.  Check out the video below!

If you enjoyed our video, please subscribe to our channel, it means a lot and the subscriptions help us stay on the road longer. Be on the lookout for more videos soon!


Skoolie Overland Travel Part 2: Why a Skoolie-Conversion Makes a Great Travel Rig

I hope you have had a chance to read Part 1 of this article before reading this one. In the first article on this topic we cover some of the negative aspects of living in a Skoolie-conversion, a lot of which we did not expect before leaving for a period of extended travel across the United States.

Check it out here: Skoolie Overland Travel Part 1: Why a Skoolie-Conversion Makes a Bad Travel Rig

Everything AND the kitchen sink

Firstly, when living in a school bus conversion, there is enough room to bring anything you would need for an adventure. We have a very small bus and are still able to cram in a queen-sized bed, a big refrigerator, all of the camera equipment we could need, 4 bicycles, 2 kayaks, and more books than we will be able to read through the course of the summer.

Our school bus is around 75 square-feet of living space and that is A LOT compared to conversion vans and truck campers. We have friends that travel in off-road trucks with slide-ins or roof top tents and the first thing they comment on is the space. “There is so much room for activities!” All Will Ferrell quotes aside, when it rains, snows, or drops below freezing, we are warm and dry inside. Rachael’s yoga practice can still carry on even if there is a torrential downpour outside.


Custom cabinets that need bungees to stay shut

Another aspect of traveling in a Skoolie is that the design is 100% customizable! The builder can customize the design and layout however they see fit. Once the seats and the floor are yanked out, the bus can be built to include anything that you can fit in the space. Cruise the interwebs for a bit and you will find Skoolies with 2000+ watt solar systems, full-size bathtubs, mobile workstations, the opportunities inside are endless. The biggest challenge is making the decision on toilet vs. no toilet.

We built a simple interior using remedial carpentry skills and equipment, but it has served us really well so far. You can see the inside of our bus on our video tour below:


An aspect of Skoolie ownership that we did not expect is that Skoolies, especially short Skoolies, are surprisingly capable off-road. No, we are not seeking out off-road opportunities to test the flex of our suspension or drive through 4-foot deep mud holes, but to get to more remote campsites we have endured some off-camber and sketchy situations.

Smaller busses are built on similar chassis to full-size trucks, so in general, there shouldn’t be much difference between taking a Chevy 3500 Silverado and the Okienomad’s Skoolie down a Forest Service road. The motor in our bus is shared with the military Humvee and a lot of farm trucks and Suburban’s of the past 25 years, so it is no surprise that when geared right, out bus will climb up and over some stuff.

Below is a photo of a campsite that we were rewarded with after an arduous climb up a rutted Forest Service road near Anza, CA. Worth it!


As mentioned in Part 1 of this article, one of our favorite and least favorite parts of Skoolie overland travel is that Skoolies are slow! How slow you ask? We got passed by a full-size pickup hauling a trailer that had to have been 12,000 pounds or more like we were standing still. I couldn’t even recognize the make of the truck it was moving so fast, or err, we were moving so slowly. The slow speed of the Skoolie up mountain passes, around turns, and over washboard roads makes it the perfect overlanding vehicle, you simply see more than if you were flying by at 75 miles per hour in a new sprinter van.

If we had to choose, we would travel slow every day of the year and not miss a minute of it.


One of my favorite aspects of bus travel is that Skoolie conversions do less damage to the environment. Keep in mind that traveling a ton of miles on a less-than-efficient diesel engine through beautiful forests and deserts is not exactly healthy for the environment, however, keeping a big hunk of metal out of a scrap yard and in use is a win for the environment when you consider the alternative of buying a newer vehicle such as an RV or full-size truck camper. We have recycled our bus from its previous life of shuttling kids to a new life of seeing beautiful things every day.

Once we are done with our travels in the bus we will likely park the bus somewhere nice and quiet and use it as a cabin in the woods or a suite for the visiting in-laws or parents. We will only need to add a composting toilet or outhouse and a small shower area to make the Skoolie 100% livable off-grid, reducing the need to use a ton of new material to build a new house someday.


A Skoolie for sale now!

Lastly in our list of reasons why a Skoolie is a great overlanding vehicle is that Skoolies are cheap! School districts, churches, and metropolitan transit companies are constantly shuttling out (pun intended) gently used, fleet-maintained vehicle for rock-bottom prices. Most of these vehicles have been maintained since day-one by competent mechanics and are usually on the auction block with less than 200,000 miles on them, a considerably small amount in regards to the life of a well-maintained diesel engine.

Our bus came to us with 107,000 miles on it and other than some neglected maintenance issues by the second owner of the bus, we have had 13,000+ trouble-free miles out of it.

Not only are skoolies cheap to buy, they are cheap to build. You don’t have to have an Insta-famous porcelain tub or a teak-wood deck on the roof of your bus. You can build a bus that is simple 2×4 and plywood construction, slap on a little paint and you are good to hit the road. Our bus was built with materials that are cheap and available at any hardware store with tools that most people already own.


If you are still hanging on through all of that negative, I hope you have had the chances to read Part 2 of this article, Skoolie Overland Travel Part 2: Why a Skoolie-Conversion Makes a Bad Travel Rig. We are really happy with our choice to hit the road in our Skoolie and we wouldn’t trade the experience for anything.

If you have enjoyed our article, please explore the blog some more as there are tons of stories, write-ups, and photos from our travels around the country. If you want a more streamlined media feed, check out our Instagram and Facebook pages, thanks for stopping by!


Skoolie Overland Travel Part 1: Why a Skoolie-Conversion Makes a Bad Travel Rig

I need to clear this up before we get to the good stuff: My wife and I live in a school bus conversion, by choice. We love the freedom and simplicity that comes from a life with 78 square-feet of living space and having the whole world as our playground. That being said, there are aspects of skooliedom that we did not expect. We met several travelers on the road that shared some of these sentiments about their school buses too, so we knew we were not alone. There is a companion article to this one about why skoolies are great for travel, in case this one drags you down too much.

Check it out here: Skoolie Overland Travel Part 2: Why a Skoolie-Conversion Makes a Great Travel Rig


First, Skoolies are BIG! Even if you purchase the smallest modern school bus (which we did) it is still 20-22 feet long, 8 feet wide, and over 9 feet tall. After we gutted the interior, built out a home inside, and filled up our water and fuel tanks, our bus weighs just under 10,000 pounds! The size of these metal behemoths makes them difficult to navigate down narrow 4-wheel-drive trails and some forest service roads. The height and width can also make traveling through some tunnels equally as difficult. The tunnel entering Zion National Park from the East was going to charge us $20 to pass through their tunnel, luckily, we had time to spare and drove around the southern end of the park to enjoy Pink Sand Dunes State Park instead.

Imagine wanting to take that iconic Instagram shot on the beach with your skoolie looking all accomplished on the sand? Think again. Unless you have 4-wheel-drive (pretty rare), reliable recovery gear, and some know-how, you are going to get stuck. Expect to need a fairly large truck or tractor to pull your 10,000+ pound butt out of the sand.

Some skoolies can reach Class-A RV size and at that point, forget about leaving the pavement, passing through most tunnels, and parking in any parking lot other than a Wal-Mart.


Skoolies are SLOW!

While we are on the topic of driving slowly, expect to drive slowly…very slowly. Unless you commit significant amounts of money to increase your busses horsepower and torque, your bus will probably be underpowered. Expect to travel at speeds much slower than traffic around you and commit a lot of time to making the extremely coveted left turn or to pass a Volkswagen van travelling slower than even you are traveling.

If you read Part 2 of this post, you will see that this point also shows up as a positive of traveling via school bus conversion. Hop on over to that article to find out why.


Skoolies are built to haul kids around cities, not haul your stuff through mountain trails.

Think back to when you were a child and you rode the bus to school, if you were one of those important kids whose mothers coddled you, just imagine with me. You are engaged in conversation or a game of M.A.S.H (don’t lie, you know you did) and all of a sudden you hear a noise and a split second later you are catapulted several feet in the air and you are quickly joined by everyone else on the bus, except the driver, she has a seatbelt.

I can remember riding the bus back from high school basketball games as a student and after exhausting myself on the court, seeking refuge in the plush pleather seats of the school bus and drifting into a restful nap just in time for the bus to catch a small pothole and lift me several inches in the air and drop my face back on the seat with exceptional force. Riding in the passenger area of a school bus is not pleasant.

Now imagine that most of your belongings, your computer and camera, maybe even your dog is somewhere in the rear of your Skoolie conversion and you are driving through San Diego on your way to the Sierras. You hit an unavoidable pothole and now your belongings, passengers, and tastefully hand-crafted cabinet doors are at the mercy of your top-heavy, overweight school bus.

Some modern-day school buses now come equipped with air-ride suspension, air brakes, and sometimes even seatbelts for children. Ours, however, didn’t even come with a rear sway bar. Therefore, we roll over obstacles with the front wheel fine and feel the wrath of the rear axle as the bus topples side to side. Cornering with no rear sway bar is interesting as well as the risk of roll-over is greatly increased. We solve these problems by traveling very slowly, even through traffic. Yes, we could add a sway bar, and probably will. But, the added cost associated with making a Skoolie road-worthy pushes the budget too far. With a couple more thousand-dollar upgrades, we could have afforded a full-size truck with a slide-in camper and been able to travel much farther and as comfortably as we could in a Skoolie, for the same price.


You see a juicy snack, vehicle dwellers see a sharp or blunt object poised to attack.

If there isn’t a secure home for every item in your bus, it becomes a projectile.

This is more of a common issue with living in a vehicle in general, but when we first laid out our plans for the interior of the bus we never knew that we would need and want so many cubbies, shelves, drawers, and hiding places for the miscellaneous junk that finds its way onto the bed every couple of days.

Who knew that sitting 4 or 5 Nalgenes under the kitchen table and driving down a twisting mountain road would cause a ruckus like you have never heard as the bottle tip, tumble, and fly around the cozy passenger compartment?

Since moving into our bus full-time we have added shelves, baskets, nets, and a bunch of other containment solutions to keep our at-hand items from hitting us in the head on the freeway. When you see the #vanlifer on the grams with pictures hanging on the wall and glass mason jars on the counter with fresh flowers in them, understand that the scene before you is carefully crafted and in the event that the Skoolie in question is actually driven, those items are stowed somewhere or they are stowed everywhere.


When something breaks (and it will break), Skoolie parts are not easy to come by, especially on the road. We will use our bus as an example. Our bus is technically a 2000 Chevrolet 139 Cutaway with a 6.5L Turbo-charged diesel engine. This means we share a motor with a lot of different Chevy trucks, busses, vans, and even a few military and civilian HMMVV’s, and not much else.

So, when we need an air filter, we can just order one for the 6.5L and be done with it. Easy, peasy. However, when we need to buy a trailer hitch in Concrete, WA because ours is bending and dangling our precious bikes and new bike rack within inches of the asphalt, which vehicle model do we use? If we use the 2000 Chevy Express Van, which works with other parts, we will soon find out that the frame widths and construction were completely different between the two models and that our bus more closely resembles a full-size, heavy duty Chevy Pickup truck. The only challenge now is to find the model of Silverado with the same frame width as the bus, then order that model online, ship it general delivery to Concrete, WA, and install it in the post office parking lot with a cordless drill and hand tools.

Homework assignment: Go to your nearest parts store, tell the chap behind the counter that you need a driver’s door handle for a 2000 Chevy 139 Cutaway. Wait patiently, you will be there for a while.


Shade Tree Mechanic in Oregon

Lastly, when you break down and the repair is above your skill level, finding a mechanic to work on a Skoolie is not easy. For some reason, a lot of shops that we have spoken with won’t even touch our rig because it is an 8-lug chassis and therefore bigger than they want to mess with or bigger than they are capable of messing with.

In Oakhurst, CA we needed a simple brake job done and didn’t feel comfortable replacing pads and shoes on a dirt forest service road. We contacted 6 shops and not a single one would even consider looking at our brakes. One even went as far as to tell us that the only way they would work on it is if they replaced the rotors too, at $215 a piece. We finally found a shop that had a cancellation and would fit us in, but it wasn’t cheap.


If you are still hanging on through all of that negative, I hope you have had the chances to read Part 2 of this article, Skoolie Overland Travel Part 2: Why a Skoolie-Conversion Makes a Great Travel Rig. We are really happy with our choice to hit the road in our Skoolie and we wouldn’t trade the experience for anything.

If you have enjoyed our article, please explore the blog some more as there are tons of stories, write-ups, and photos from our travels around the country. If you want a more streamlined media feed, check out our Instagram and Facebook pages, thanks for stopping by!


5 Steps to Save the Planet Every Day

Since transitioning to a nomadic lifestyle, we have found more and more ways to reduce our environmental impact. Below are five ways that we have changed our lifestyle to do a little more for our planet.

Stop with the Plastic Sacks Already!

There are very few instances when plastic sacks at the clothing, grocery, or convenience stores makes any logical sense. Around 5,000,000,000,000 plastic bags are produced YEARLY and most of the trash in our oceans is plastic.

Alternative: Use canvas shopping bags instead of plastic. Leave a few canvas bags in your vehicle and remember to take them into the store with you when you shop. Some stores will even give you credit for using canvas bags.

Avoid Using Plastic Drink Bottles

On the many miles of trail that we have hiked and biked across our country we have seen and picked up hundreds of plastic bottles. Some sources claim that a PET bottle takes around 1,000 years to biodegrade naturally.

Alternative: Use a reusable cup such as an Ozark Trail, Yeti, or another of the many different brands that make stainless steel cups. Although the process to produce a stainless cup is less than environmentally friendly, if you use it regularly over a long period of time it is a step in the right direction.


Recycle or Reuse Everything You Can

Did you leave your reusable bags at home and drive across town to the grocery store? No worries, use your plastic bags as trash bags around your house several times if possible. When building our bus, we used old cut up bike tubes as rubber grommets to run cable and PEX tubing throughout the bus. When a t-shirt gets beyond an acceptable state of ragged, tear it up into garage or kitchen rags.


Conserve Electricity & Use Solar Power if Available

Besides our engine, our entire bus is powered by solar power. We have 300 watts of solar mounted on the roof that powers LED lights, a high-efficiency refrigerator, and a small inverter. We have found that when we rely on the sun for our electronics, we waste less and use less altogether. 300 watts has been more than enough to support all of our electronics with some to spare.

Do you have a light on at home while you are at work? Is there weather-stripping around one of your windows that lets in outside air? All of these things can require more electricity and cost the environment and your wallet.


Conserve Water

Perhaps the easiest and most time-honored way to save the planet is to consume less water. The average person uses 80-100 gallons of water per day. In our bus with a simple 12V water pump and small storage tanks as well as our re-usable water bottles, we use less than 80 gallons every two weeks! Here are some ways to reduce your water consumption at home:

-Don’t run the water while brushing your teeth

-Skip watering the lawn

-Ensure that all plumbing and fixtures operate as they should and don’t leak

-Replace inefficient appliances with High Efficiency units that use less water and electricity

-Take shorter showers

We hope this list has been helpful and that you have found new ways to help the environment. If you have different ways that you reduce, reuse, or recycle, please send us an e-mail! We would love to learn some new tactics to reduce our footprint.


FREE Camping in Southern California

We were pleasantly surprised to find more than enough FREE camping SoCal and we didn’t have to camp in a Wal-Mart parking lot! Below are some of our favorite sites from our time in Southern California.

Laguna Mountain

Julian, CA

GPS: 32.977978, -116.524818

We end up in trailhead parking lots a lot of the time because they are well-traveled, have access to trails, and normally have toilets. This spot was simple, had a great view of Anza Borrego in the distance, and was right on the Pacific Crest Trail.

There are quite a few level spots here and a vault toilet is available. Take a walk on the nearby Sunset Trail for beautiful views at the foot of the Sierras.


San Diego River Preserve

San Diego, CA

GPS: 32.76000856, -117.2250726

This site is a pull-out along the San Diego River in the heart of SD. There is bound to be a fair bit of traffic noise and potential conversations with homeless people living nearby, but you can’t beat the location for a quick night’s sleep and 5-minute drives to Sea World, Ocean Beach, and much more.

This can be an intimidating place to park, but we left our rig here for 4-5 hours at night and rode our bikes to Ocean Beach to have dinner and drinks and enjoy the ocean. There are plenty of runners and cyclists that use this abandoned road day and night, so we never felt unsafe here.


Law Street Beach

San Diego, CA

GPS: 32.8025916, -117.2595628

This section of curbside next to Pacific Beach is one of the best FREE camping spots we have ever had. The view of the Ocean is magnificent and the amount of active people around was very refreshing. There is not a lot of solitude here, but there is plenty of ocean to share.

This site had bathrooms and showers nearby and one only had to make sure not to park here during street sweeping, one day per week.


Thomas Mountain

Anza, CA

GPS: 33.5792566, -116.6241575

There are loads of pull outs and campsites along this OHV trail/road near Anza, CA. The road can be a bit rough and steep, so we stopped short of the top and had a great view of the valley below.

Vehicle with low-clearance should really try somewhere else, this road is rutted and rocky in places and could be hard to navigate in a rig larger than 24 feet.


North Joshua Tree BLM

Joshua Tree, CA

GPS: 34.172932, -116.224663

If you are looking for a peaceful escape from the modern world, this is not it. This is a dry creek bed that is used heavily for off-roading, dirt biking, and any other loud vehicle driving that you can think of. The lake bed is beautiful and very flat, but don’t plan on going to sleep until dark.

This is a perfect overnight spot before entering Joshua Tree National Park. The West Entrance is just minutes away and has a bathroom and brochure station for the park.


Sawtooth Canyon (New Jack City)

Barstow, CA

GPS: 34.670395, -116.98423

We recently (March 2020) added this campsite as we traveled to LA for work and this made a perfect stopover from Northern Arizona.

This campground is managed by the Bureau of Land Management and is very busy in the climbing season (October-March). There is a ton of climbing available in this area and something can be found for climbers of all skill levels. This site has toilets but they were full when we visited, there was also zero occupancy when we arrived on a Wednesday night in March-arrive early. All in all, it wasn’t a bad place to stopover on the way to LA. Be sure and hike to the top of the ridge and check out the views looking toward Big Bear.

We had some of our most unique campsites of our whole summer in So Cal and we think you will enjoy them too! Did we miss any spots along our route? E-mail us and let us know!

Top 5 Things to See and Do in Southern Utah

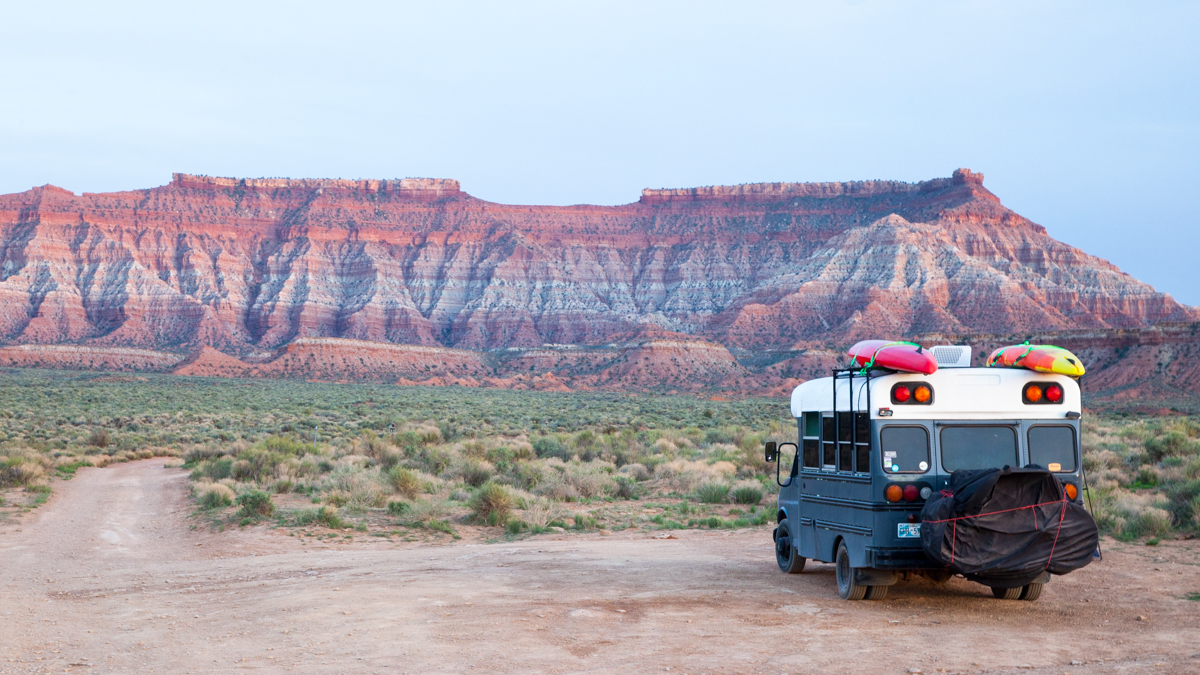
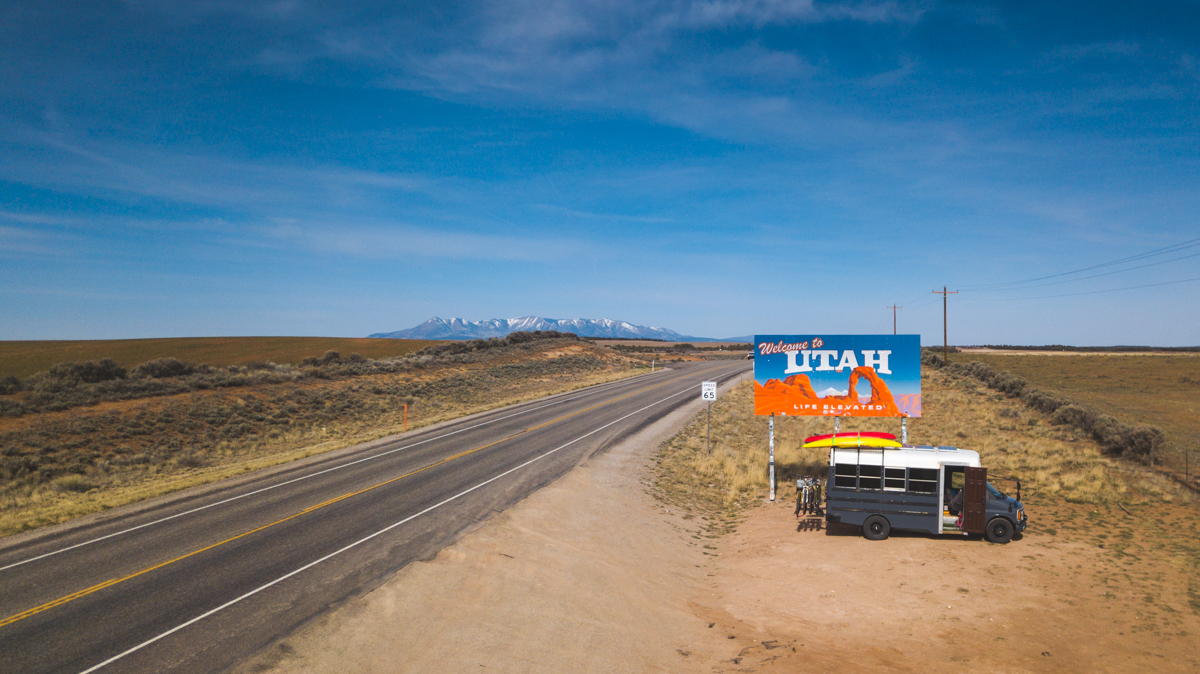
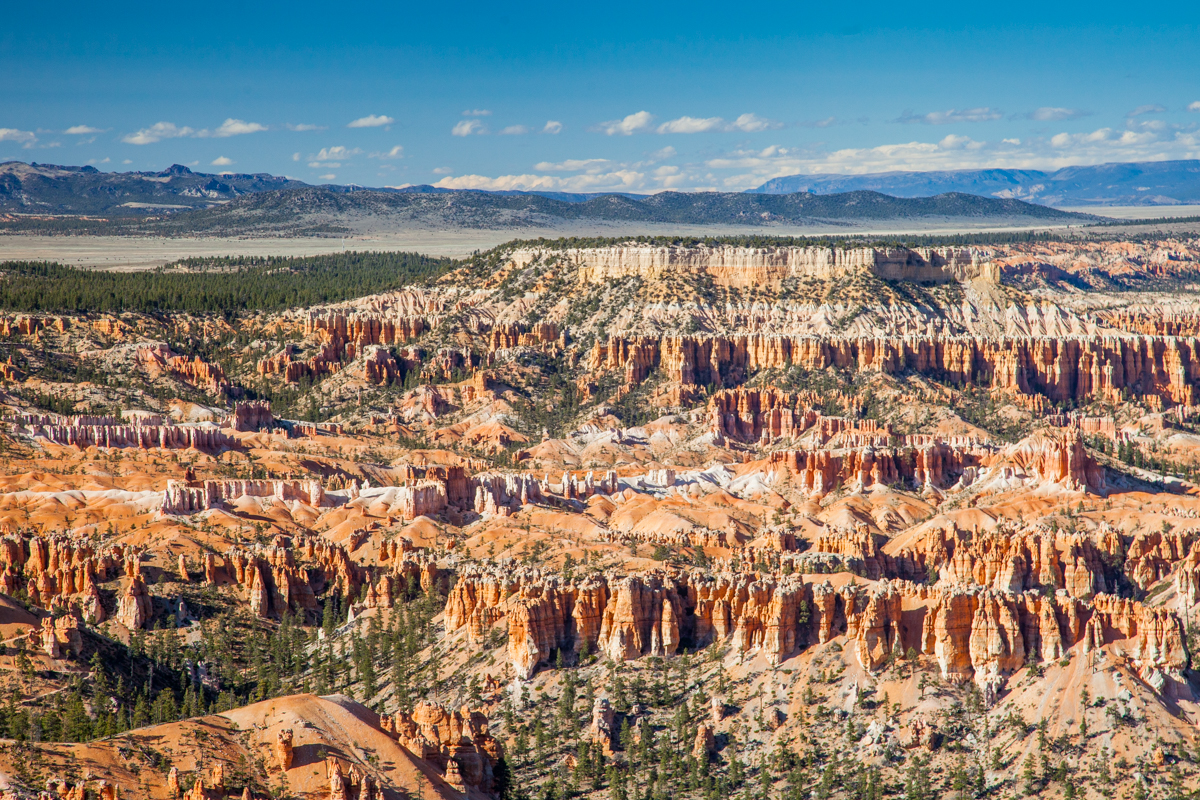
Utah is beautiful, mystifying, and captivating. These are our top-5 stops in Southern Utah. These might not be the most popular, but they are unique, creative, and rewarding experiences for the traveler that is looking to beat the crowds and still see amazing things.

Leprechaun Canyon-Hanksville, UT

  1. Explore the Irish Slot Canyons

Utah is synonymous with canyoneering. Spend some time exploring the labyrinth of slot canyons along the highway near Hanksville, UT( Mile Marker 80.5 ish). You will be rewarded with amazing views, challenging climbs, and amazing solitude.


Grand Staircase Escalante National Monument- Escalante, UT

  1. Backpack in the Grand Staircase Escalante National Monument

Explorers that venture down Hole-in-the-Rock Road near Escalante, UT will be rewarded with nearly endless trails and awesome scenery. The overnighter that we chose followed Harris Wash to the Escalante River and back. We had the trail mostly to ourselves and got to hike in some of the most remote and scenic areas of the Monument.


Continue reading “Top 5 Things to See and Do in Southern Utah”

Every Once and a While, Do the Touristy Stuff!

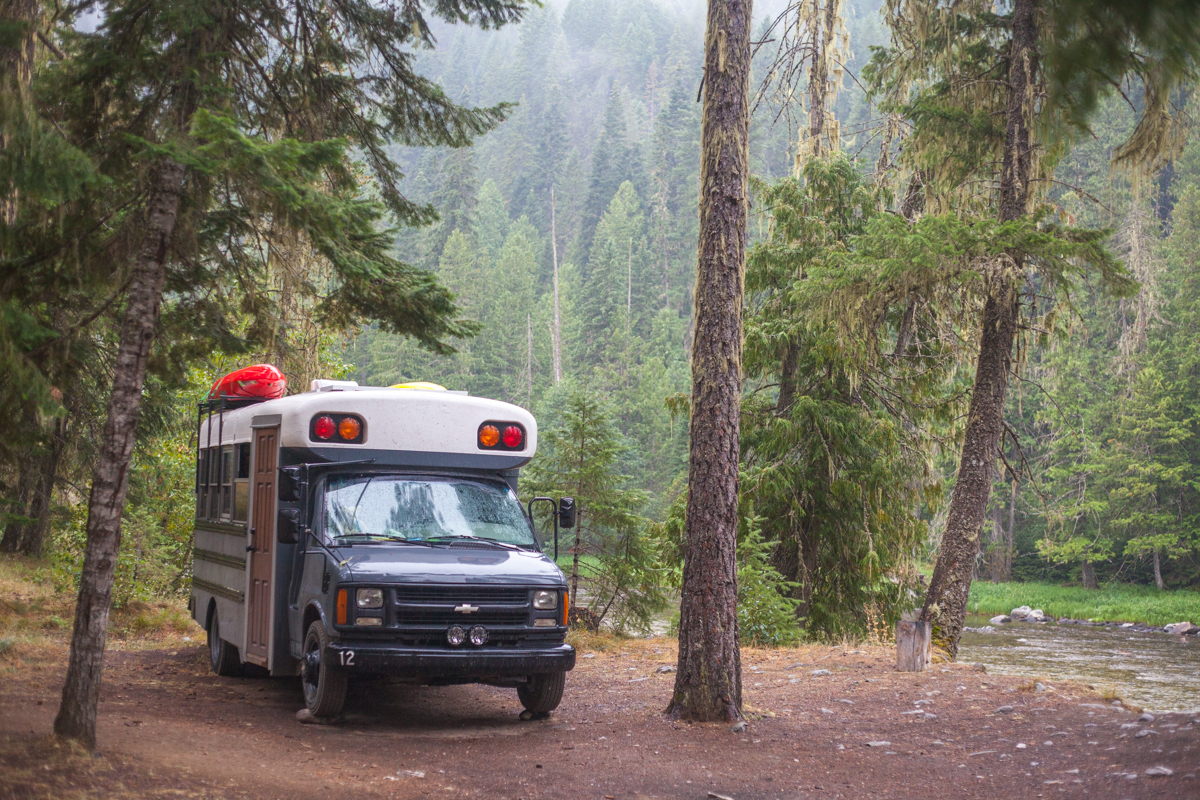
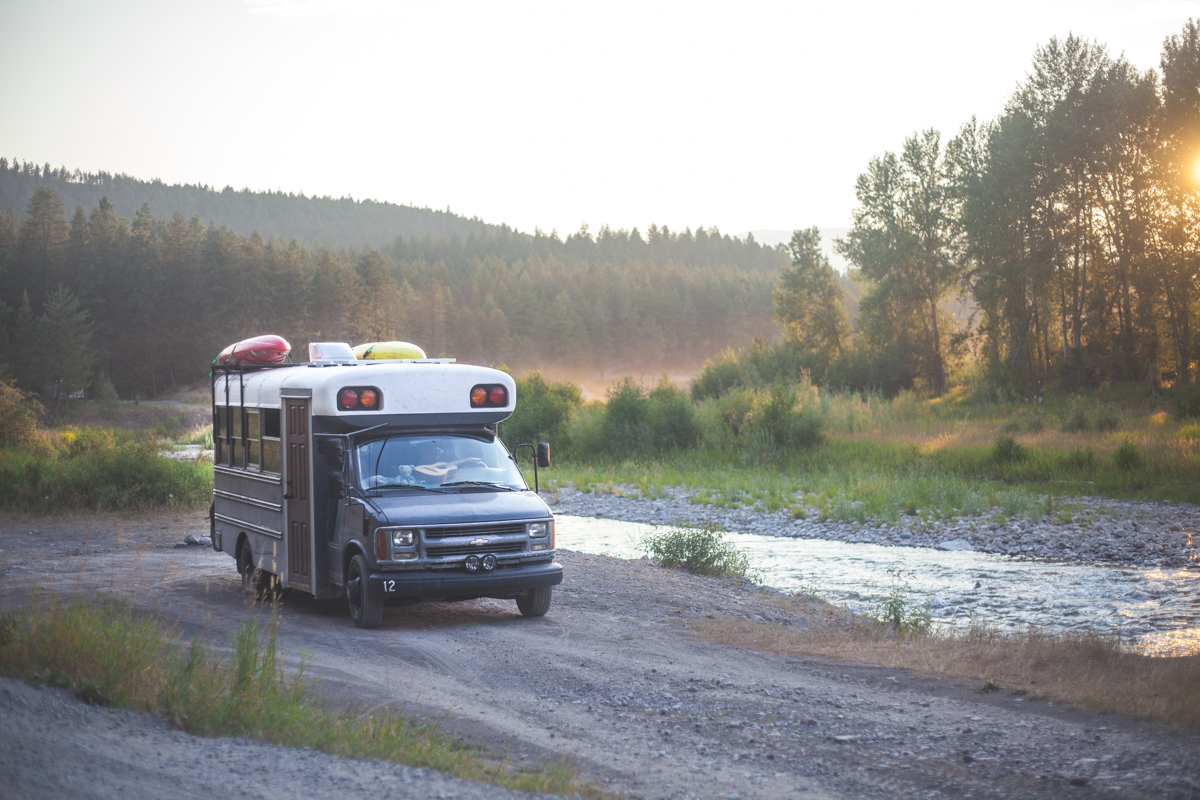
Rachael and I are not very touristy people. We like to camp in the National Forest with few neighbors and even fewer utilities; this article is being written in a National Forest coincidently enough. We bike or drive into the National Parks before day-break so we can skip the crowds and still see the cool stuff. Although we are devoting almost all of our time to traveling the country and seeing a lot of attractions, I still wouldn’t classify us as “touristy”.

A week or so ago, we were backpacking in the Grand Staircase Escalante National Monument and the hundreds of water crossings did a number on Rachael’s feet. She has blisters and bruising from her water shoes and we have Grand Canyon backpacking permits in a few weeks, so that meant we were taking it easy in Bryce Canyon (not an easy task for either of us).

Backpacking in Grand Staircase Escalante

With all of that being said, we did something very touristy in Bryce Canyon National Park, we took a bus-tour! And it paid off big-time!

We showed up in the park mid-morning on a weekday and signed up for the Rainbow Point Bus Tour. The tour is ran by the National Park Service and is completely FREE. They have numerous pick-ups at the area hotels and at Ruby’s Inn. The tour is 3-ish hours long and is the best thing that we did while in the Bryce Canyon area, see below for the worst thing we did in Bryce.


The worst thing that we did in Bryce was buying groceries at Ruby’s Inn. This tourist-trap gas station, mediocre restaurant and understocked grocery store are the reason that people visit the national park, then travel on to another area. My father has worked in retail my entire life and he has raised me to appreciate a good grocery store. This was not it. Expect to pay astronomical prices for the simplest of groceries…$1.50 for a (1) apple, $4.99 for an 8-slice pack of bologna, $9.00 for a (1) can of Coleman propane, insanity. We got the bare minimum that could get us by and got out! Stock up before you go to Bryce and don’t continue to make these people rich.


Back to the tour, more importantly the tour guide. April, with Canyon Fever Guides, provided us with one of the best tourist experiences that either of us have ever had. She was born nearby and has lived in the Bryce area for 35 years. All of that experience and family knowledge is passed on to you when you take her tour.

The tour winds through the various stopping points along the dead-end road that meanders through the park, with April giving excellent descriptions of the topography, the flora and fauna, and the rich history of the area surrounding the park. She even threw in some corny “dad” jokes throughout that Rachael really enjoyed. Once the tour was over, we couldn’t believe that it was FREE and available for anyone to sign up for. We highly encourage that you check out her guide service for your time in Bryce or at the very least, sign up for the Rainbow Point bus tour and ask for April!

We learned an important lesson through this tour and that is to not be a travel snob. When you live in your vehicle and you see beautiful things every day, it is easy to get caught up in judging the people that are simply trying to enjoy their 2-week vacation. As my wife likes to remind me, “at least they are outside”. There is truth to that, everyone deserves to enjoy the outdoors, regardless of how they choose to enjoy it. Bus tours are touristy but sometimes theres a reason that everyone is taking them.


Below are the contact details for April and Canyon Fever Guides. We hope you enjoy your time with her as much as we did!

Facebook

Website

Phone: (435) 531-9039

error

Enjoy our content? Help spread the word! ;)

Follow by Email
YouTube
YouTube
Instagram